
The overlay network
rippled's peer-to-peer overlay — mesh topology, connection types and the OverlayImpl / PeerImp architecture.
What you'll learn
- Describe the mesh topology and connection types.
- Map the overlay code (Overlay, OverlayImpl, Peer, PeerImp).
- Understand how the overlay carries consensus and transaction traffic.
Introduction
≈90 min · Advanced · builds on Crypto pitfalls & performance
Watch this short video by XRPL Commons first, then dive into the details below.
Zoom out from single connections to the whole peer-to-peer fabric. In this module you'll learn the mesh topology of rippled's overlay, the connection types that make it up, and the Overlay/OverlayImpl/Peer/PeerImp classes that implement it. This is the network that carries every proposal, validation and transaction across the world.
The Overlay Interface
In brief: the abstract API for the peer-to-peer network.
The Overlay interface defines the contract for peer-to-peer network management. It abstracts away the complexity of connection handling, allowing other subsystems to focus on their responsibilities without understanding networking details.
This design follows the interface segregation principle: consumers of the Overlay interact with a minimal, focused API rather than the full complexity of the networking implementation.
Key idea. The overlay is a mesh, not a hub. Every node keeps many peer connections at once, which is what makes the network resilient with no central point.
OverlayImpl: The Concrete Implementation
In brief: the class that actually manages every peer connection.
The OverlayImpl class provides the actual implementation of overlay functionality. It manages the complete lifecycle of peer connections and coordinates with multiple subsystems including the Resource Manager, PeerFinder, and HashRouter.
The class maintains several data structures for efficient peer management. The m_peers map tracks peers by their connection slots, while ids_ provides fast lookup by peer ID. The list_ container tracks all active connection attempts and established connections as "child" objects.
Why use a recursive mutex? Networking operations often involve callbacks that may trigger additional operations requiring the same lock. A recursive mutex allows the same thread to acquire the lock multiple times, preventing deadlocks in these scenarios.
Peer Object and Connection Lifecycle
In brief: how a single peer connection is born, lives, and dies.
Peer and PeerImp Classes
- Peer (Peer.h):
- Abstract base class representing a network peer.
- Specifies pure virtual methods for peer communication, transaction queue management, resource charging, feature support, ledger and transaction set queries, and status reporting.
- Methods include
send,getRemoteAddress,id,cluster,getNodePublic,json,supportsFeature, and more. - PeerImp (PeerImp.h, PeerImp.cpp):
- Implements the core logic for a peer connection.
- Manages state, communication, protocol handling, message sending/receiving, resource usage, protocol versioning, compression, transaction and ledger synchronization, and feature negotiation.
- Tracks peer metrics, manages transaction and ledger queues, and handles protocol-specific messages.
- Supports features like transaction reduce relay, ledger replay, and squelching.
- Inherits from Peer and OverlayImpl::Child, and is tightly integrated with the application's overlay and resource management subsystems.
OverlayImpl Class
- OverlayImpl (OverlayImpl.h, OverlayImpl.cpp):
- Main implementation of the Overlay interface.
- Manages peer connections, message broadcasting and relaying, peer discovery, resource management, and network metrics.
- Handles the lifecycle of peer objects, tracks network traffic, manages timers and asynchronous operations, and provides JSON-based status and metrics reporting.
- Supports squelching (rate-limiting) of validators, manages manifests, and integrates with the server handler and resource manager.
Conclusion
The overlay architecture provides a robust foundation for peer-to-peer communication in the XRP Ledger. By abstracting network complexity behind clean interfaces and managing connections through a centralized Overlay manager, the system achieves both flexibility and reliability. Understanding this architecture is essential for anyone working on network optimization, debugging connectivity issues, or implementing new peer-to-peer features.
Overlay Network: Peer-to-Peer Networking Layer
Introduction
The Overlay Network is Rippled's peer-to-peer networking layer that enables distributed nodes to discover each other, establish connections, and communicate efficiently. Without the overlay network, the XRP Ledger would be a collection of isolated servers, the overlay network is what transforms individual nodes into a cohesive, decentralized system.
Understanding the overlay network is essential for debugging connectivity issues, optimizing network performance, and ensuring your node participates effectively in the XRP Ledger network. Whether you're running a validator, a stock server, or developing network enhancements, deep knowledge of the overlay network is crucial.
{% embed url="https://www.youtube.com/watch?v=CC47Z4AyRGE" %}
Network Topology and Architecture
Mesh Network Design
The XRP Ledger uses a mesh topology where nodes maintain direct connections with multiple peers. This differs from:
- Star topology: Central hub (single point of failure)
- Ring topology: Sequential connections (vulnerable to breaks)
- Tree topology: Hierarchical structure (root node critical)
Mesh Advantages:
- No single point of failure: Network remains operational if individual nodes fail
- Multiple communication paths: Messages can route around failed nodes
- Scalability: Network can grow organically as nodes join
- Resilience: Network topology self-heals as nodes enter and exit
Network Layers
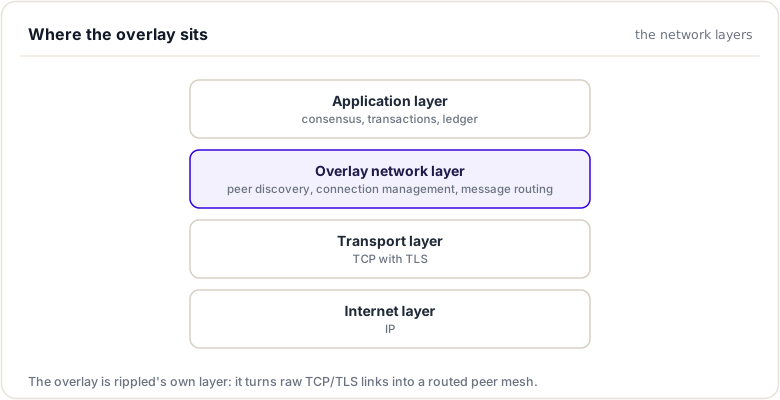
The overlay network sits between the application logic and the transport layer, abstracting away the complexities of peer-to-peer communication.
Connection Types
Rippled maintains three types of peer connections:
1. Outbound Connections
Definition: Connections initiated by your node to other peers
Characteristics:
- Your node acts as client
- You choose which peers to connect to
- Configurable connection limits
- Active connection management
Configuration:
[ips]
# DNS or IP addresses to connect to
r.ripple.com 51235
s1.ripple.com 51235
s2.ripple.com 51235
2. Inbound Connections
Definition: Connections initiated by other nodes to your server
Characteristics:
- Your node acts as server
- Must listen on public interface
- Accept connections from unknown peers
- Subject to connection limits
Configuration:
[port_peer]
port = 51235
ip = 0.0.0.0      # Listen on all interfaces
protocol = peer
3. Fixed Connections
Definition: Persistent connections to trusted peers
Characteristics:
- High priority, always maintained
- Automatically reconnect if disconnected
- Bypass some connection limits
- Ideal for validators and cluster peers
Configuration:
[ips_fixed]
# Always maintain connections to these peers
validator1.example.com 51235
validator2.example.com 51235
cluster-peer.example.com 51235
Target Connection Count
Rippled aims to maintain a target number of active peer connections:
Default Targets (based on node_size):
tiny:    10 peers
small:   15 peers
medium:  20 peers (default)
large:   30 peers
huge:    40 peers
Connection Distribution:
- Approximately 50% outbound connections
- Approximately 50% inbound connections
- Fixed connections count toward total
- System adjusts dynamically to maintain target
Peer Discovery Mechanisms
1. Configured Peer Lists
The most basic discovery method, manually configured peers:
[ips] Section: Peers to connect to automatically
[ips]
r.ripple.com 51235
s1.ripple.com 51235
validator.example.com 51235
[ips_fixed] Section: High-priority persistent connections
[ips_fixed]
critical-peer.example.com 51235
Advantages:
- Reliable, known peers
- Administrative control
- Suitable for private networks
Disadvantages:
- Manual maintenance required
- Limited to configured peers
- Doesn't scale automatically
2. DNS Seeds
DNS-based peer discovery for bootstrap:
How It Works:
- Node queries DNS for peer addresses
- DNS returns A records (IP addresses)
- Node connects to returned addresses
- Learns about additional peers through gossip
Configuration:
[ips]
# These resolve via DNS
r.ripple.com 51235
s1.ripple.com 51235
DNS Resolution Example:
$ dig +short r.ripple.com
54.186.73.52
54.184.149.41
52.24.169.78
Advantages:
- Easy bootstrap for new nodes
- Dynamic peer lists
- Load balancing via DNS
Disadvantages:
- Requires DNS infrastructure
- Vulnerable to DNS attacks
- Single point of failure for initial connection
3. Peer Gossip Protocol
Peers share information about other peers they know:
Message Type: Endpoint announcements (part of peer protocol)
Process:
- Peer A connects to Peer B
- Peer B shares list of other known peers
- Peer A considers these peers for connection
- Peer A may connect to some of the suggested peers
Gossip Information Includes:
- Peer IP addresses
- Peer public keys
- Last seen time
- Connection quality hints
Advantages:
- Network self-organizes
- No central directory needed
- Discovers new peers automatically
- Network grows organically
Disadvantages:
- Potential for malicious peer injection
- Network topology influenced by gossip patterns
- Initial bootstrapping still needed
4. Peer Crawler
Some nodes run peer crawlers to discover and monitor network topology:
What Crawlers Do:
- Connect to known peers
- Request peer lists
- Recursively discover more peers
- Map network topology
- Provide public peer directories
Public Peer Lists:
- Various community-maintained lists
- Used by new nodes to bootstrap
- Updated regularly
Connection Establishment and Handshake
Connection Lifecycle
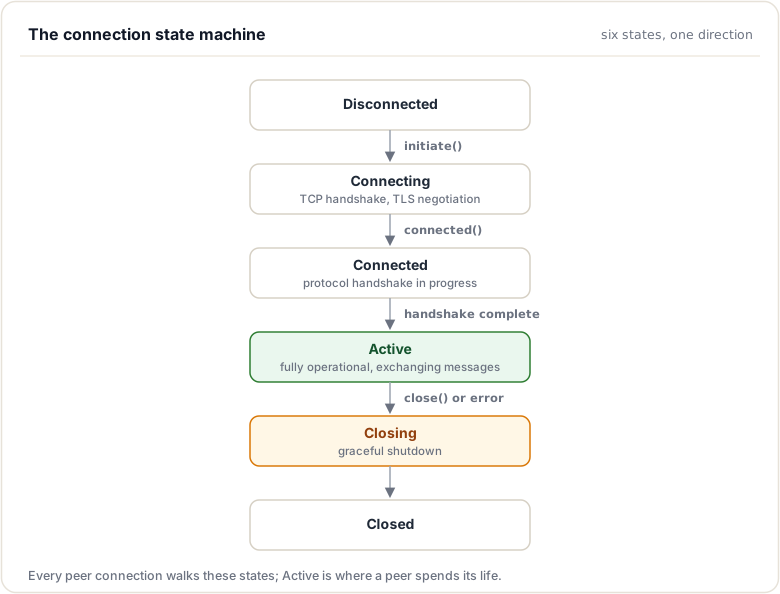
Detailed Handshake Process
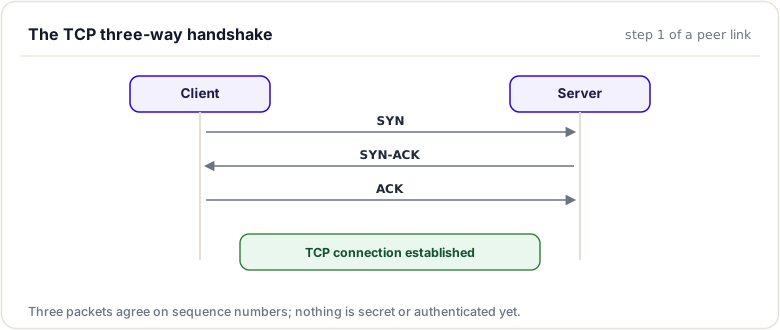
Step 1: TCP Connection
Standard TCP three-way handshake:
Configuration:
[port_peer]
port = 51235
ip = 0.0.0.0
protocol = peer
Step 2: TLS Handshake (Mandatory)
If TLS is configured, encrypted channel is established:
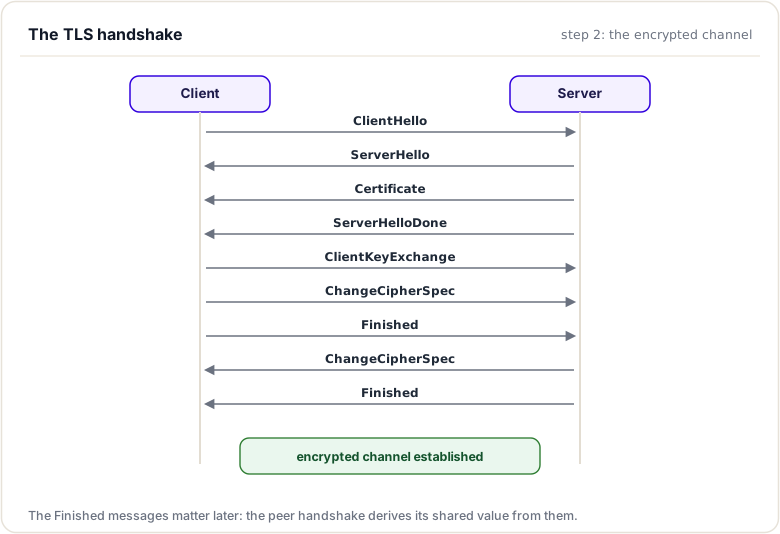
Benefits of TLS:
- Encrypted communication (privacy)
- Peer authentication (security)
- Protection against eavesdropping
- Man-in-the-middle prevention
Step 3: Protocol Handshake (HTTP Upgrade)
Historic versions of rippled exchanged a TMHello protobuf message here; that protocol is gone. Since then the peer handshake rides on HTTP: the initiator sends an HTTP GET with Upgrade: XRPL/2.2 headers, and the responder answers 101 Switching Protocols. The interesting fields travel as headers:
GET / HTTP/1.1
Connection: Upgrade
Upgrade: XRPL/2.2
Connect-As: Peer
Network-ID: 0
Public-Key: n9K...                # the node's public key
Session-Signature: MEUCIQ...      # proof of key ownership, bound to the TLS session
The Session-Signature signs a value derived from the TLS session's Finished messages, so the identity proof cannot be replayed on another connection. The responder validates the network, the protocol version range, and the signature before switching to the binary peer protocol. The Peer handshake module dissects every header and the signature math in detail.
Step 4: Connection Acceptance/Rejection
After handshake validation:
If Compatible:
- Connection moves to Active state
- Add to peer list
- Begin normal message exchange
- Log successful connection
If Incompatible:
- Send rejection message with reason
- Close connection gracefully
- Log rejection reason
- May add to temporary ban list
Rejection Reasons:
enum DisconnectReason
{
    drBadData,           // Malformed handshake
    drProtocol,          // Protocol incompatibility
    drSaturated,         // Too many connections
    drDuplicate,         // Already connected to this peer
    drNetworkID,         // Different network (testnet vs mainnet)
    drBanned,            // Peer is banned
    drSelf,              // Trying to connect to self
};
Connection Management
Connection Limits
Rippled enforces various connection limits:
Per-IP Limits
// Maximum connections from single IP
constexpr size_t maxPeersPerIP = 2;

// Prevents single entity from dominating connections
bool acceptConnection(IPAddress const& ip)
{
    auto count = countConnectionsFromIP(ip);
    return count < maxPeersPerIP;
}
Total Connection Limits
Based on node_size configuration:
tiny:    max 10 connections
small:   max 21 connections
medium:  max 40 connections
large:   max 62 connections
huge:    max 88 connections
Formula: target + (target / 2)
Fixed Peer Priority
Fixed peers bypass some limits:
bool shouldAcceptConnection(Peer const& peer)
{
    // Always accept fixed peers
    if (isFixed(peer))
        return true;

    // Check against limits for regular peers
    if (activeConnections() >= maxConnections())
        return false;

    return true;
}
Connection Quality Assessment
Rippled continuously monitors peer quality:
Metrics Tracked
Latency: Response time to ping messages
// Ping-pong protocol
void sendPing()
{
    auto ping = std::make_shared<protocol::TMPing>();
    ping->set_type(protocol::TMPing::ptPING);
    ping->set_seq(nextPingSeq_++);
    ping->set_timestamp(now());

    send(ping);
}

void onPong(protocol::TMPing const& pong)
{
    auto latency = now() - pong.timestamp();
    updateLatencyMetrics(latency);
}
Message Rate: Messages per second
void trackMessageRate()
{
    messagesReceived_++;

    auto elapsed = now() - windowStart_;
    if (elapsed >= 1s)
    {
        messageRate_ = messagesReceived_ / elapsed.count();
        messagesReceived_ = 0;
        windowStart_ = now();
    }
}
Error Rate: Protocol errors, malformed messages
void onProtocolError()
{
    errorCount_++;

    if (errorCount_ > maxErrorThreshold)
    {
        // Disconnect problematic peer
        disconnect(drBadData);
    }
}
Uptime: Connection duration
auto uptime = now() - connectionTime_;
Quality Scoring
Peers are scored based on metrics:
int calculatePeerScore(Peer const& peer)
{
    int score = 100;  // Start with perfect score

    // Penalize high latency
    if (peer.latency() > 500ms)
        score -= 20;
    else if (peer.latency() > 200ms)
        score -= 10;

    // Penalize low message rate (inactive peer)
    if (peer.messageRate() < 0.1)
        score -= 15;

    // Penalize errors
    score -= peer.errorCount() * 5;

    // Reward long uptime
    if (peer.uptime() > 24h)
        score += 10;

    return std::max(0, std::min(100, score));
}
Score Usage:
- Low-scoring peers may be disconnected
- High-scoring peers prioritized for reconnection
- Informs peer selection decisions
Connection Pruning
When connection limits are reached, low-quality peers are pruned:
void pruneConnections()
{
    if (activeConnections() <= targetConnections())
        return;

    // Sort peers by score (lowest first)
    auto peers = getAllPeers();
    std::sort(peers.begin(), peers.end(),
        [](auto const& a, auto const& b)
        {
            return a->score() < b->score();
        });

    // Disconnect lowest-scoring non-fixed peers
    for (auto& peer : peers)
    {
        if (isFixed(peer))
            continue;  // Never disconnect fixed peers

        peer->disconnect(drSaturated);

        if (activeConnections() <= targetConnections())
            break;
    }
}
Reconnection Logic
After disconnection, Rippled may attempt to reconnect:
Exponential Backoff:
Duration calculateReconnectDelay(int attempts)
{
    // Exponential backoff with jitter
    auto delay = minDelay * std::pow(2, attempts);
    delay = std::min(delay, maxDelay);

    // Add random jitter (±25%)
    auto jitter = delay * (0.75 + random() * 0.5);

    return jitter;
}

// Example progression:
// Attempt 1: ~5 seconds
// Attempt 2: ~10 seconds
// Attempt 3: ~20 seconds
// Attempt 4: ~40 seconds
// Attempt 5+: ~60 seconds (capped)
Fixed Peer Priority:
void scheduleReconnect(Peer const& peer)
{
    Duration delay;

    if (isFixed(peer))
    {
        // Aggressive reconnection for fixed peers
        delay = 5s;
    }
    else
    {
        // Exponential backoff for regular peers
        delay = calculateReconnectDelay(peer.reconnectAttempts());
    }

    scheduleJob(delay, [this, peer]()
    {
        attemptConnection(peer.address());
    });
}
Message Routing and Broadcasting
Message Types
Different message types require different routing strategies:
Critical Messages (Broadcast to All)
Validations (tmVALIDATION):
- Must reach all validators
- Broadcast to all peers immediately
- Critical for consensus
Consensus Proposals (tmPROPOSE_LEDGER):
- Must reach all validators
- Time-sensitive
- Broadcast widely
Broadcast Pattern:
void broadcastCritical(std::shared_ptr<Message> const& msg)
{
    for (auto& peer : getAllPeers())
    {
        // Send to everyone
        peer->send(msg);
    }
}
Transactions (Selective Relay)
Transaction Messages (tmTRANSACTION):
- Should reach all nodes eventually
- Don't need immediate broadcast to all
- Use intelligent relay
Relay Logic:
void relayTransaction(
    std::shared_ptr<Message> const& msg,
    Peer* source)
{
    for (auto& peer : getAllPeers())
    {
        // Don't echo back to source
        if (peer.get() == source)
            continue;

        // Check if peer likely already has it
        if (peerLikelyHas(peer, msg))
            continue;

        // Send to peer
        peer->send(msg);
    }
}
Request/Response (Unicast)
Ledger Data Requests (tmGET_LEDGER):
- Directed to specific peer
- Response goes back to requester
- No broadcasting needed
Unicast Pattern:
void requestLedgerData(
    LedgerHash const& hash,
    Peer* peer)
{
    auto request = makeGetLedgerMessage(hash);
    peer->send(request);  // Send only to this peer
}
Duplicate Suppression
Duplicate suppression prevents message echo loops (distinct from squelching, which mutes redundant senders of validator messages via TMSquelch; see the Handshake & message relaying module):
Problem:
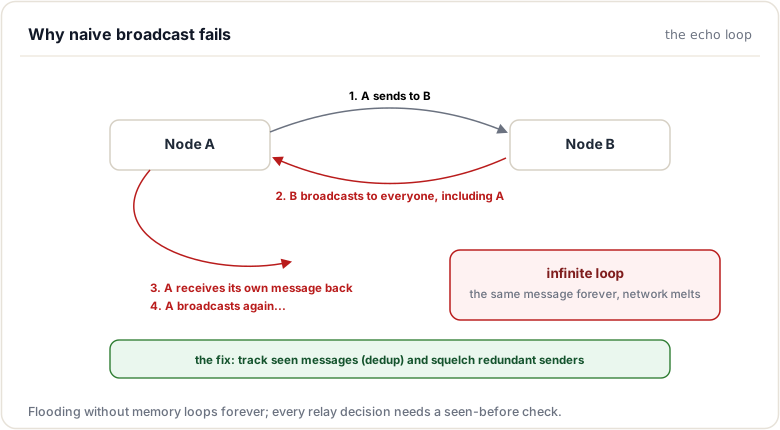
Solution:
void onMessageReceived(
    std::shared_ptr<Message> const& msg,
    Peer* source)
{
    // Track message hash
    auto hash = msg->getHash();

    // Have we seen this before?
    if (recentMessages_.contains(hash))
        return;  // Ignore duplicate

    // Record that we've seen it
    recentMessages_.insert(hash);

    // Process message
    processMessage(msg);

    // Relay to others (excluding source)
    relayToOthers(msg, source);
}
Recent Message Cache:
- Time-based expiration (e.g., 30 seconds)
- Size-based limits (e.g., 10,000 entries)
- LRU eviction policy
Message Priority Queues
Outbound messages are queued with priority:
enum MessagePriority
{
    priVeryHigh,    // Validations, critical consensus
    priHigh,        // Proposals, status changes
    priMedium,      // Transactions
    priLow,         // Historical data, maintenance
};

class PeerMessageQueue
{
private:
    std::map<MessagePriority, std::queue<Message>> queues_;

public:
    void enqueue(Message msg, MessagePriority priority)
    {
        queues_[priority].push(msg);
    }

    Message dequeue()
    {
        // Dequeue from highest priority non-empty queue
        for (auto& [priority, queue] : queues_)
        {
            if (!queue.empty())
            {
                auto msg = queue.front();
                queue.pop();
                return msg;
            }
        }

        throw std::runtime_error("No messages");
    }
};
Benefits:
- Critical messages sent first
- Prevents head-of-line blocking
- Better network utilization
Network Health and Monitoring
Health Metrics
Connectivity Metrics
Active Peers: Current peer count
size_t activePeers = overlay.size();
Target vs Actual: Comparison to target
bool isHealthy = activePeers >= (targetPeers * 0.75);
Connection Distribution:
size_t outbound = countOutboundPeers();
size_t inbound = countInboundPeers();
float ratio = float(outbound) / inbound;

// Healthy: ratio between 0.5 and 2.0
bool balancedConnections = (ratio > 0.5 && ratio < 2.0);
Network Quality Metrics
Average Latency:
auto avgLatency = calculateAverageLatency(getAllPeers());

// Healthy: < 200ms average
bool lowLatency = avgLatency < 200ms;
Message Rate:
auto totalRate = sumMessageRates(getAllPeers());

// Messages per second across all peers
Validator Connectivity:
auto validatorPeers = countValidatorPeers();
auto unlSize = getUNLSize();

// Should be connected to most of UNL
bool goodValidatorConnectivity =
    validatorPeers >= (unlSize * 0.8);
RPC Monitoring Commands
peers Command
Get current peer list:
xrpld peers
Response:
{
  "result": {
    "peers": [
      {
        "address": "54.186.73.52:51235",
        "latency": 45,
        "uptime": 3600,
        "version": "rippled-1.9.0",
        "public_key": "n9KorY8QtTdRx...",
        "complete_ledgers": "32570-75234891"
      }
      // ... more peers
    ]
  }
}
peer_reservations Command
View reserved peer slots:
xrpld peer_reservations_add <public_key> <description>
xrpld peer_reservations_list
connect Command
Manually connect to peer:
xrpld connect 192.168.1.100:51235
Logging and Diagnostics
Enable detailed overlay logging:
[rpc_startup]
{ "command": "log_level", "partition": "Overlay", "severity": "trace" }
Log Messages to Monitor:
"Overlay": "Connected to peer 54.186.73.52:51235"
"Overlay": "Disconnected from peer 54.186.73.52:51235, reason: saturated"
"Overlay": "Handshake failed with peer: protocol version mismatch"
"Overlay": "Received invalid message from peer, closing connection"
"Overlay": "Active peers: 18/20 (target)"
Codebase Deep Dive
Key Files and Directories
Overlay Core:
src/xrpld/overlay/Overlay.h- Main overlay interfacesrc/xrpld/overlay/detail/OverlayImpl.h- Implementation headersrc/xrpld/overlay/detail/OverlayImpl.cpp- Core implementation
Peer Management:
src/xrpld/overlay/Peer.h- Peer interfacesrc/xrpld/overlay/detail/PeerImp.h- Peer implementationsrc/xrpld/overlay/detail/PeerImp.cpp- Peer logic
Connection Handling:
src/xrpld/overlay/detail/ConnectAttempt.h- Outbound connectionssrc/xrpld/overlay/detail/OverlayImpl.cpp- Inbound connection handoff (onHandoff)
Message Processing:
src/xrpld/overlay/detail/ProtocolMessage.h- Message definitionssrc/xrpld/overlay/detail/Message.cpp- Message handling
Key Classes
Overlay Class
class Overlay
{
public:
    // Start/stop overlay network
    virtual void start() = 0;
    virtual void stop() = 0;

    // Peer management
    virtual void connect(std::string const& ip) = 0;
    virtual std::size_t size() const = 0;

    // Message broadcasting
    virtual void broadcast(std::shared_ptr<Message> const&) = 0;
    virtual void relay(
        std::shared_ptr<Message> const&,
        Peer* source = nullptr) = 0;

    // Peer information
    virtual Json::Value json() = 0;
    virtual std::vector<Peer::ptr> getActivePeers() = 0;
};
PeerImp Class
class PeerImp : public Peer
{
public:
    // Send message to this peer
    void send(std::shared_ptr<Message> const& m) override;

    // Process received message
    void onMessage(std::shared_ptr<Message> const& m);

    // Connection state
    bool isConnected() const;
    void disconnect(DisconnectReason reason);

    // Quality metrics
    std::chrono::milliseconds latency() const;
    int score() const;

private:
    // Connection management
    boost::asio::ip::tcp::socket socket_;
    boost::asio::ssl::stream<socket_t&> stream_;

    // Message queues
    std::queue<std::shared_ptr<Message>> sendQueue_;

    // Metrics
    std::chrono::steady_clock::time_point connected_;
    std::chrono::milliseconds latency_;
    int score_;
};
Code Navigation Tips
Finding Connection Logic
Search for connection establishment:
// In OverlayImpl.cpp
void OverlayImpl::connect(std::string const& ip)
{
    // Parse IP and port
    auto endpoint = parseEndpoint(ip);

    // Create connection attempt
    auto attempt = std::make_shared<ConnectAttempt>(
        app_,
        io_service_,
        endpoint,
        peerFinder_.config());

    // Begin async connection
    attempt->run();
}
Tracing Message Flow
Follow message from receipt to processing:
// PeerImp::onMessage (entry point)
void PeerImp::onMessage(std::shared_ptr<Message> const& msg)
{
    // Check for duplicates (duplicate suppression)
    if (app_.overlay().hasSeen(msg->getHash()))
        return;

    // Mark as seen
    app_.overlay().markSeen(msg->getHash());

    // Process based on type
    switch (msg->getType())
    {
        case protocol::mtTRANSACTION:
            onTransaction(msg);
            break;
        case protocol::mtVALIDATION:
            onValidation(msg);
            break;
        // ... other types
    }

    // Relay to other peers
    app_.overlay().relay(msg, this);
}
Connect to XRP Ledger Foundation validator
xrpld connect r.ripple.com:51235
**Step 2**: Verify connection

```bash
xrpld peers | grep "r.ripple.com"
Step 3: Observe handshake in logs
"Overlay": "Connected to r.ripple.com:51235"
"Overlay": "Handshake complete with peer n9KorY8..."
"Overlay": "Added peer n9KorY8... to active peers"
Part 4: Network Health Check
Step 1: Check peer count over time
# Run every minute for 10 minutes
for i in {1..10}; do
  echo "$(date): $(xrpld peers | grep -c address) peers"
  sleep 60
done
Step 2: Monitor connection churn
# Count new connections and disconnections
grep -c "Connected to peer" /var/log/rippled/debug.log
grep -c "Disconnected from peer" /var/log/rippled/debug.log
Step 3: Assess stability
Calculate:
- Connection churn rate (disconnections per hour)
- Average peer lifetime
- Reconnection frequency
Part 5: Peer Quality Distribution
Step 1: Extract peer metrics
From peers output, record for each peer:
- Latency
- Uptime
- Complete ledgers range
Step 2: Create distribution charts
Latency distribution:
0-50ms:    |||||| (6 peers)
51-100ms:  |||||||||| (10 peers)
101-200ms: ||| (3 peers)
201+ms:    | (1 peer)
Step 3: Identify issues
- Are any peers consistently high-latency?
- Do any peers have incomplete ledger history?
- Are there peers with low uptime?
Analysis Questions
Answer these based on your observations:
- What's your average peer latency?
- Is it acceptable (<200ms)?
- How stable are your connections?
- High churn may indicate network issues
- Are you well-connected to validators?
- Check against your UNL
- What's your network position?
- Are you mostly receiving or mostly sending connections?
- Do you see any problematic peers?
- High latency, frequent disconnections?
- How does your node handle connection limits?
- Does it maintain target peer count?
Common Issues and Solutions
Issue 1: Low Peer Count
Symptoms: Active peers consistently below target
Possible Causes:
- Firewall blocking inbound connections
- ISP blocking port
- Poor peer quality (all disconnect quickly)
Solutions:
# Check firewall
sudo iptables -L | grep 51235

# Verify port is accessible
telnet your-ip 51235

# Check if node is reachable
xrpld server_info | grep pubkey_node
Issue 2: High Latency Peers
Symptoms: Average latency >200ms
Possible Causes:
- Geographic distance to peers
- Network congestion
- Poor quality peers
Solutions:
# Manually connect to closer peers
xrpld connect low-latency-peer.example.com:51235

# Add fixed peers in same region
[ips_fixed]
local-peer-1.example.com 51235
local-peer-2.example.com 51235
Issue 3: Frequent Disconnections
Symptoms: High connection churn rate
Possible Causes:
- Network instability
- Protocol incompatibility
- Being saturated by other peers
Solutions:
# Check logs for disconnect reasons
grep "Disconnected" /var/log/rippled/debug.log

# Look for patterns
grep "Disconnected.*reason" /var/log/rippled/debug.log | \
  cut -d: -f4 | sort | uniq -c
Issue 4: No Validator Connections
Symptoms: Not connected to any UNL validators
Possible Causes:
- Validators are unreachable
- Validators' connection slots full
- Network configuration issues
Solutions:
# Manually connect to validators
xrpld connect validator.example.com:51235

# Use fixed connections for validators
[ips_fixed]
validator1.example.com 51235
validator2.example.com 51235
Additional Resources
Official Documentation
- XRP Ledger Dev Portal: xrpl.org/docs
- Peer Protocol: xrpl.org/peer-protocol
- Server Configuration: xrpl.org/rippled-server-configuration
Codebase References
src/xrpld/overlay- Overlay network implementationsrc/xrpld/overlay/detail/PeerImp.cpp- Peer connection handlingsrc/xrpld/overlay/detail/OverlayImpl.cpp- Core overlay logic
Related Topics
- Protocols - Protocol message formats and communication
- Consensus Engine - How consensus uses overlay network
- Application Layer - How overlay integrates with application
Summary
This module zoomed out to the whole peer-to-peer overlay. You learned its mesh topology (many connections per node, no central point), the different connection types, and the classes that implement it (Overlay, OverlayImpl, Peer, PeerImp). This is the fabric that carries every proposal, validation, and transaction across the network.
To remember:
- Topology: a mesh, many peers per node, no central hub
- Classes:
Overlay(interface),OverlayImpl(manager),Peer/PeerImp(one per connection) - It carries transactions, proposals, validations, ledger data, and endpoint gossip
- Connection kinds: inbound, outbound, fixed
peers(admin RPC) shows your live slice of the mesh: direction, version, latency- Default peer port: 51235 (TLS); client RPC is a different port entirely
- Code:
src/xrpld/overlay(implementation underdetail/) - Watch out: the overlay is transport, not trust; who you connect to and whose validations you trust (UNL) are orthogonal
Next up. You know the mesh's shape; how does a brand-new node join it? Next: peer discovery, bootstrapping, and the connection lifecycle.
Resources
Assignments
0 of 2 complete