
The Application layer
How the `Application` class wires rippled together — the central orchestrator that owns and coordinates every subsystem, plus the job queue and configuration.
What you'll learn
- Explain how the Application acts as a dependency-injection container / service locator.
- Trace rippled's startup, run and shutdown sequence.
- Identify the major subsystems (LedgerMaster, NetworkOPs, Overlay, NodeStore…) and how to reach them.
- Understand the job queue and how work is scheduled.
Introduction
≈60 min · Advanced · builds on Build & run your own xrpld node
Now that your node runs, let's see what actually holds it together. At the center of rippled sits one object (the Application class) that owns and wires up every subsystem, from the ledger to the network to storage. In this module you'll trace how the node starts up, runs and shuts down, meet the major subsystems and the job queue that schedules their work, and learn how any component reaches another. It's the map you'll keep coming back to as the codebase gets deeper.
The Application Class Architecture
In brief: the single object that owns every subsystem and hands them out on request (a service locator).
Design Philosophy
The Application class follows several key design principles that make Rippled maintainable and extensible:
Single Point of Coordination: Instead of components directly creating and managing their dependencies, everything flows through the Application. This centralization makes it easy to understand system initialization and component relationships.
Dependencies through the Application: rippled predominantly uses the service locator style: subsystems receive Application& and ask it for what they need (app.getLedgerMaster()), rather than receiving each dependency in their constructor. A few components do take explicit constructor dependencies, but Application& is the norm; it trades some testability for one obvious place to find everything.
Interface-Based Design: The Application class implements the Application interface, allowing for different implementations (production, test, mock) without changing dependent code.
Lifetime Management: The Application controls the creation, initialization, and destruction of all major subsystems, ensuring proper startup/shutdown sequences.
Application Interface
The Application interface is defined in src/xrpld/app/main/Application.h:
The interface every subsystem is reached through:
class Application : public beast::PropertyStream::Source
{
public:
    // Core services
    virtual Logs& logs() = 0;
    virtual Config const& config() const = 0;

    // Networking
    virtual Overlay& overlay() = 0;
    virtual JobQueue& getJobQueue() = 0;

    // Ledger management
    virtual LedgerMaster& getLedgerMaster() = 0;
    virtual OpenLedger& openLedger() = 0;

    // Transaction processing
    virtual NetworkOPs& getOPs() = 0;
    virtual TxQ& getTxQ() = 0;

    // Consensus
    virtual Validations& getValidations() = 0;

    // Storage
    virtual NodeStore::Database& getNodeStore() = 0;
    virtual RelationalDatabase& getRelationalDatabase() = 0;

    // RPC and subscriptions
    virtual RPCHandler& getRPCHandler() = 0;

    // Lifecycle
    virtual void setup() = 0;
    virtual void run() = 0;
    virtual void signalStop() = 0;

    // Utility
    virtual bool isShutdown() = 0;
    virtual std::chrono::seconds getMaxDisallowedLedger() = 0;

protected:
    Application() = default;
};
ApplicationImp Implementation
The concrete implementation ApplicationImp is in src/xrpld/app/main/Application.cpp. This class:
- Implements all interface methods
- Owns all major subsystem objects
- Manages initialization order
- Coordinates shutdown
- Provides cross-cutting services
Key Member Variables:
class ApplicationImp : public Application
{
private:
    // Configuration and logging
    std::unique_ptr<Logs> logs_;
    Config config_;

    // Core services
    std::unique_ptr<JobQueue> jobQueue_;
    std::unique_ptr<NodeStore::Database> nodeStore_;
    std::unique_ptr<RelationalDatabase> relationalDB_;

    // Networking
    std::unique_ptr<Overlay> overlay_;

    // Ledger management
    std::unique_ptr<LedgerMaster> ledgerMaster_;
    std::unique_ptr<OpenLedger> openLedger_;

    // Transaction processing
    std::unique_ptr<NetworkOPs> networkOPs_;
    std::unique_ptr<TxQ> txQ_;

    // Consensus
    std::unique_ptr<Validations> validations_;

    // RPC
    std::unique_ptr<RPCHandler> rpcHandler_;

    // State
    std::atomic<bool> isShutdown_{false};
    std::condition_variable cv_;
    std::mutex mutex_;
};
Key idea. Almost nothing in rippled constructs its own dependencies; it asks the
Applicationfor them. Find theApplicationand you can reach the whole node.
Initialization and Lifecycle
In brief: how the node starts up, runs, and shuts down, in order.
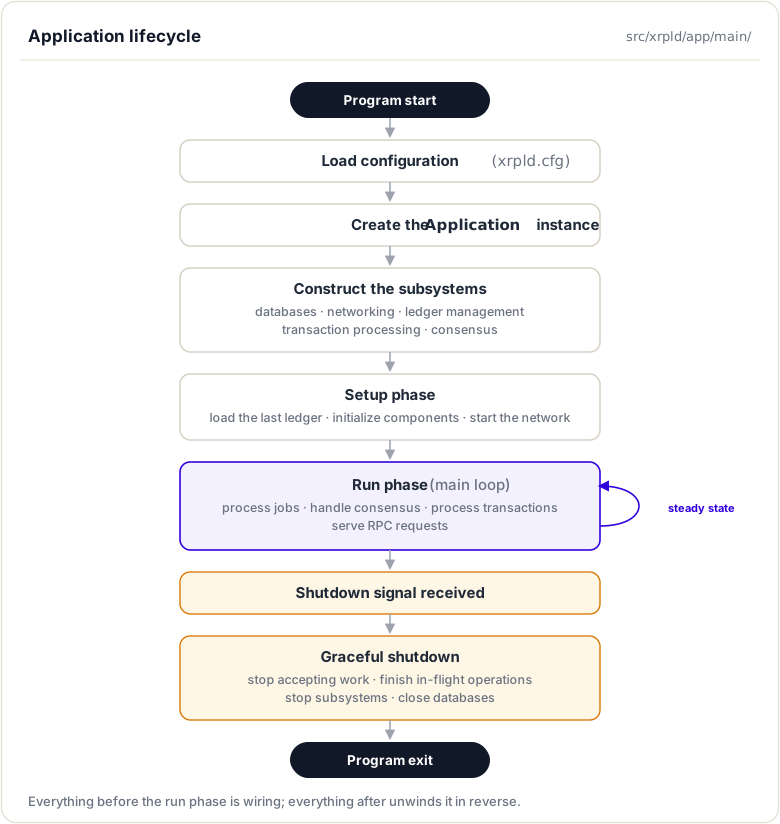
Startup Sequence
Understanding the startup sequence is crucial for debugging initialization issues and understanding component dependencies.
Phase 1: Configuration Loading
// In Main.cpp
auto config = std::make_unique<Config>();
if (!config->setup(configFile, quiet))
{
    // Configuration failed
    return -1;
}
What Happens:
- Parse
xrpld.cfgconfiguration file - Load validator list configuration
- Set up logging configuration
- Validate configuration parameters
- Apply defaults for unspecified options
Configuration Sections:
[server]- Server ports and interfaces[node_db]- NodeStore database configuration[node_size]- Performance tuning parameters[validation_seed]- Validator key configuration[ips_fixed]- Fixed peer connections[features]- Amendment votes
Phase 2: Application Construction
// Create the application instance
auto app = make_Application(
    std::move(config),
    std::move(logs),
    std::move(timeKeeper));
Constructor Sequence (ApplicationImp::ApplicationImp()):
ApplicationImp::ApplicationImp(
    std::unique_ptr<Config> config,
    std::unique_ptr<Logs> logs,
    std::unique_ptr<TimeKeeper> timeKeeper)
    : config_(std::move(config))
    , logs_(std::move(logs))
    , timeKeeper_(std::move(timeKeeper))
{
    // 1. Create basic services
    jobQueue_ = std::make_unique<JobQueue>(
        *logs_,
        config_->WORKERS);

    // 2. Initialize databases
    nodeStore_ = NodeStore::Manager::make(
        "NodeStore.main",
        scheduler,
        *logs_,
        config_->section("node_db"));

    relationalDB_ = makeRelationalDatabase(
        *config_,
        *logs_);

    // 3. Create ledger management
    ledgerMaster_ = std::make_unique<LedgerMaster>(
        *this,
        stopwatch(),
        *logs_);

    // 4. Create networking
    overlay_ = std::make_unique<OverlayImpl>(
        *this,
        config_->section("overlay"),
        *logs_);

    // 5. Create transaction processing
    networkOPs_ = std::make_unique<NetworkOPsImp>(
        *this,
        *logs_);

    txQ_ = std::make_unique<TxQ>(
        *config_,
        *logs_);

    // 6. Create consensus components
    validations_ = std::make_unique<Validations>(
        *this);

    // 7. Create RPC handler
    rpcHandler_ = std::make_unique<RPCHandler>(
        *this,
        *logs_);

    // Note: Order matters! Components may depend on earlier ones
}
Phase 3: Setup
app->setup();
What Happens (ApplicationImp::setup()):
void ApplicationImp::setup()
{
    // 1. Load existing ledger state
    auto initLedger = getLastFullLedger();

    // 2. Initialize ledger master
    ledgerMaster_->setLastFullLedger(initLedger);

    // 3. Start open ledger
    openLedger_->accept(
        initLedger,
        orderTx,
        consensusParms,
        {}); // Empty transaction set for new ledger

    // 4. Initialize overlay network
    overlay_->start();

    // 5. Start RPC servers
    rpcHandler_->setup();

    // 6. Additional subsystem initialization
    // ...

    JLOG(j_.info()) << "Application setup complete";
}
Phase 4: Run
app->run();
Main Event Loop (ApplicationImp::run()):
void ApplicationImp::run()
{
    JLOG(j_.info()) << "Application starting";

    // Start processing jobs
    jobQueue_->start();

    // Enter main loop
    {
        std::unique_lock<std::mutex> lock(mutex_);

        // Wait until shutdown signal
        while (!isShutdown_)
        {
            cv_.wait(lock);
        }
    }

    JLOG(j_.info()) << "Application stopping";
}
What Runs:
- Job queue processes queued work
- Overlay network handles peer connections
- Consensus engine processes rounds
- NetworkOPs coordinates operations
- RPC handlers process client requests
All work happens in background threads managed by various subsystems. The main thread simply waits for a shutdown signal.
Phase 5: Shutdown
app->signalStop();
Graceful Shutdown (ApplicationImp::signalStop()):
void ApplicationImp::signalStop()
{
    JLOG(j_.info()) << "Shutdown requested";

    // 1. Set shutdown flag
    isShutdown_ = true;

    // 2. Stop accepting new work
    overlay_->stop();
    rpcHandler_->stop();

    // 3. Complete in-flight operations
    jobQueue_->finish();

    // 4. Stop subsystems (reverse order of creation)
    networkOPs_->stop();
    ledgerMaster_->stop();

    // 5. Close databases
    nodeStore_->close();
    relationalDB_->close();

    // 6. Wake up main thread
    cv_.notify_all();

    JLOG(j_.info()) << "Shutdown complete";
}
Shutdown Order: Components are stopped in reverse order of their creation to ensure dependencies are still available when each component shuts down.
Complete Lifecycle Diagram
Subsystem Coordination
In brief: how components find and call each other through the Application.
The Service Locator Pattern
The Application acts as a service locator, allowing any component to access any other component through the app reference:
class SomeComponent
{
public:
    SomeComponent(Application& app)
        : app_(app)
    {
        // Components store app reference
    }

    void doWork()
    {
        // Access other components through app
        auto& ledgerMaster = app_.getLedgerMaster();
        auto& overlay = app_.overlay();
        auto& jobs = app_.getJobQueue();

        // Use the components...
    }

private:
    Application& app_;
};
Major Subsystems
LedgerMaster
Purpose: Manages the chain of validated ledgers and coordinates ledger progression.
Key Responsibilities:
- Track current validated ledger
- Build candidate ledgers for consensus
- Synchronize ledger history
- Maintain ledger cache
- Coordinate with consensus engine
Access: app.getLedgerMaster()
Important Methods:
// Get current validated ledger
std::shared_ptr<Ledger const> getValidatedLedger();

// Get closed ledger (not yet validated)
std::shared_ptr<Ledger const> getClosedLedger();

// Advance to new ledger
void advanceLedger();

// Fetch missing ledgers
void fetchLedger(LedgerHash const& hash);
NetworkOPs
Purpose: Coordinates network operations and transaction processing.
Key Responsibilities:
- Process submitted transactions
- Manage transaction queue
- Coordinate consensus participation
- Track network state
- Publish ledger close events
Access: app.getOPs()
Important Methods:
// Submit transaction
void submitTransaction(std::shared_ptr<STTx const> const& tx);

// Process transaction
void processTransaction(
    std::shared_ptr<Transaction>& transaction,
    bool trusted,
    bool local);

// Get network state
OperatingMode getOperatingMode();
Overlay
Purpose: Manages peer-to-peer networking layer.
Key Responsibilities:
- Peer discovery and connection
- Message routing
- Network topology maintenance
- Bandwidth management
Access: app.overlay()
Important Methods:
// Send message to all peers
void broadcast(std::shared_ptr<Message> const& message);

// Get active peer count
std::size_t size() const;

// Connect to specific peer
void connect(std::string const& ip);
TxQ (Transaction Queue)
Purpose: Manages transaction queuing when network is busy.
Key Responsibilities:
- Queue transactions during high load
- Fee-based prioritization
- Account-based queuing limits
- Transaction expiration
Access: app.getTxQ()
Important Methods:
// Check if transaction can be added
std::pair<TER, bool>
apply(Application& app, OpenView& view, STTx const& tx);

// Get queue status
Json::Value getJson();
NodeStore
Purpose: Persistent storage for ledger data.
Key Responsibilities:
- Store ledger state nodes
- Provide efficient retrieval
- Cache frequently accessed data
- Support different backend databases (RocksDB, NuDB)
Access: app.getNodeStore()
Important Methods:
// Store ledger node
void store(
    NodeObjectType type,
    Blob const& data,
    uint256 const& hash);

// Fetch ledger node
std::shared_ptr<NodeObject>
fetch(uint256 const& hash);
RelationalDatabase
Purpose: SQL database for indexed data and historical queries.
Key Responsibilities:
- Store transaction metadata
- Maintain account transaction history
- Support RPC queries (account_tx, tx)
- Ledger header storage
Access: app.getRelationalDatabase()
Database Types:
- SQLite (default, embedded)
- PostgreSQL (production deployments)
Validations
Purpose: Manages validator signatures on ledger closes.
Key Responsibilities:
- Collect validations from validators
- Track validator key rotations (manifests)
- Determine ledger validation quorum
- Publish validation stream
Access: app.getValidations()
Important Methods:
// Add validation
void addValidation(STValidation const& val);

// Get validation for ledger
std::vector<std::shared_ptr<STValidation>>
getValidations(LedgerHash const& hash);

// Check if ledger is validated
bool hasQuorum(LedgerHash const& hash);
Job Queue System
In brief: how background work is queued, prioritized, and run across worker threads.
Purpose and Design
The job queue is Rippled's work scheduling system. Instead of each subsystem creating its own threads, work is submitted as jobs to a centralized queue processed by a thread pool. This provides:
- Centralized thread management: Easier to control thread count and CPU usage
- Priority-based scheduling: Critical jobs processed before low-priority ones
- Visibility: Easy to monitor what work is queued
- Deadlock prevention: Structured concurrency patterns
Job Types
Jobs are categorized by type, which determines priority:
enum JobType
{
    // Special job types
    jtINVALID = -1,
    jtPACK,             // Job queue work pack

    // High priority - consensus critical
    jtPUBOLDLEDGER,     // Publish old ledger
    jtVALIDATION_ut,    // Process validation (untrusted)
    jtPROPOSAL_ut,      // Process consensus proposal
    jtLEDGER_DATA,      // Process ledger data

    // Medium priority
    jtTRANSACTION,      // Process transaction
    jtADVANCE,          // Advance ledger
    jtPUBLEDGER,        // Publish ledger
    jtTXN_DATA,         // Transaction data retrieval

    // Low priority
    jtUPDATE_PF,        // Update path finding
    jtCLIENT,           // Handle client request
    jtRPC,              // Process RPC
    jtTRANSACTION_l,    // Process transaction (low priority)

    // Lowest priority
    jtPEER,             // Peer message
    jtDISK,             // Disk operations
    jtADMIN,            // Administrative operations
};
Submitting Jobs
Components submit work to the job queue:
// Get job queue reference
JobQueue& jobs = app.getJobQueue();

// Submit a job
jobs.addJob(
    jtTRANSACTION,  // Job type
    "processTx",     // Job name (for logging)
    [this, tx](Job&) // Job function
    {
        // Do work here
        processTransaction(tx);
    });
Job Priority and Scheduling
Priority Levels:
- Critical: Consensus, validations (must not be delayed)
- High: Transaction processing, ledger advancement
- Medium: RPC requests, client operations
- Low: Maintenance, administrative tasks
Scheduling Algorithm:
- Jobs sorted by priority and submission time
- Worker threads pick highest priority job
- Long-running jobs can be split into chunks
- System monitors queue depth and adjusts behavior
Job Queue Configuration
In xrpld.cfg:
[node_size]
# Affects worker thread count
tiny      # 1 thread
small     # 2 threads
medium    # 4 threads (default)
large     # 8 threads
huge      # 16 threads
Thread count is also influenced by CPU core count:
// Typically: max(2, std::thread::hardware_concurrency() - 1)
Configuration Management
In brief: how the node reads its config and exposes it to every subsystem.
Configuration File Structure
The xrpld.cfg file controls all aspects of server behavior. The Application loads and provides access to this configuration.
Example Configuration
[server]
port_rpc_admin_local
port_peer
port_ws_admin_local

[port_rpc_admin_local]
port = 5005
ip = 127.0.0.1
admin = 127.0.0.1
protocol = http

[port_peer]
port = 51235
ip = 0.0.0.0
protocol = peer

[port_ws_admin_local]
port = 6006
ip = 127.0.0.1
admin = 127.0.0.1
protocol = ws

[node_size]
medium

[node_db]
type=RocksDB
path=/var/lib/rippled/db/rocksdb
open_files=512
cache_mb=256
filter_bits=12
compression=1

[database_path]
/var/lib/rippled/db

[debug_logfile]
/var/log/rippled/debug.log

[sntp_servers]
time.windows.com
time.apple.com
time.nist.gov
pool.ntp.org

[ips_fixed]
r.ripple.com 51235

[validators_file]
validators.txt

[rpc_startup]
{ "command": "log_level", "severity": "warning" }

[features]
# Vote for or against amendments
# AmendmentName
Accessing Configuration
Components access configuration through the Application:
void SomeComponent::configure()
{
    // Get config reference
    Config const& config = app_.config();

    // Access specific sections
    auto const& nodeDB = config.section("node_db");
    auto const type = get<std::string>(nodeDB, "type");
    auto const path = get<std::string>(nodeDB, "path");

    // Access node size
    auto nodeSize = config.NODE_SIZE;

    // Access ports
    for (auto const& port : config.ports)
    {
        // Configure port...
    }
}
Runtime Configuration
Some settings can be adjusted at runtime via RPC:
# Change log verbosity
xrpld log_level partition severity

# Connect to peer
xrpld connect ip:port

# Get server info
xrpld server_info
Component Interaction Patterns
Pattern 1: Direct Method Calls
Most common pattern, components call each other's methods:
void NetworkOPs::submitTransaction(STTx const& tx)
{
    // Validate transaction
    auto result = Transactor::preflight(tx);
    if (!isTesSuccess(result))
        return;

    // Apply to open ledger
    auto& openLedger = app_.openLedger();
    openLedger.modify([&](OpenView& view)
    {
        Transactor::apply(app_, view, tx);
    });

    // Broadcast to network
    auto& overlay = app_.overlay();
    overlay.broadcast(makeTransactionMessage(tx));
}
Pattern 2: Job Queue for Asynchronous Work
For work that should not block the caller:
void LedgerMaster::fetchLedger(LedgerHash const& hash)
{
    // Submit fetch job
    app_.getJobQueue().addJob(
        jtLEDGER_DATA,
        "fetchLedger",
        [this, hash](Job&)
        {
            // Request from peers
            app_.overlay().sendRequest(hash);

            // Wait for response
            // Process received data
            // ...
        });
}
Pattern 3: Event Publication
Components publish events that others subscribe to:
// Publisher (LedgerMaster)
void LedgerMaster::newLedgerValidated()
{
    // Notify subscribers
    for (auto& subscriber : subscribers_)
    {
        subscriber->onLedgerValidated(currentLedger_);
    }
}

// Subscriber (NetworkOPs)
void NetworkOPs::onLedgerValidated(
    std::shared_ptr<Ledger const> const& ledger)
{
    // React to new ledger
    updateSubscribers(ledger);
    processQueuedTransactions();
}
Pattern 4: Callback Registration
Components register callbacks for specific events:
// Register callback
app_.getLedgerMaster().onConsensusReached(
    [this](std::shared_ptr<Ledger const> const& ledger)
    {
        handleConsensusLedger(ledger);
    });
Codebase Deep Dive
Key Files and Directories
Application Core:
src/xrpld/app/main/Application.h- Application interfacesrc/xrpld/app/main/Application.cpp- Implementation (theApplicationImpclass lives here)src/xrpld/app/main/Main.cpp- Entry point, creates Application
Job Queue:
include/xrpl/core/JobQueue.h- Job queue interfacesrc/libxrpl/core/detail/JobQueue.cpp- Implementationinclude/xrpl/core/Job.h- Job definition
Configuration:
src/xrpld/core/Config.h- Config classsrc/xrpld/core/detail/Config.cpp- Section name definitions
Subsystem Implementations:
src/xrpld/app/ledger/LedgerMaster.hinclude/xrpl/server/NetworkOPs.hsrc/xrpld/overlay/Overlay.hsrc/xrpld/app/misc/TxQ.h
Code Navigation Tips
Finding Application Creation
Start in Main.cpp:
int main(int argc, char** argv)
{
    // Parse command line
    // Load configuration
    // Create logs

    // Create application
    auto app = make_Application(
        std::move(config),
        std::move(logs),
        std::move(timeKeeper));

    // Setup and run
    app->setup();
    app->run();

    return 0;
}
Tracing Component Access
Follow how components access each other:
// In any component
void MyComponent::work()
{
    // Access through app_
    auto& ledgerMaster = app_.getLedgerMaster();  // → ApplicationImp::getLedgerMaster()
                                                   // → return *ledgerMaster_;
}
Understanding Job Submission
Find job submissions:
# Search for addJob calls
grep -r "addJob" src/xrpld/app/
Example:
app_.getJobQueue().addJob(jtTRANSACTION, "processTx", [&](Job&) {
    // Job code
});
Submit a payment
xrpld submit '{ "TransactionType": "Payment", "Account": "...", "Destination": "...", "Amount": "1000000" }'
Watch the logs for:

* `jtTRANSACTION` jobs being queued
* Job processing time
* Queue depth changes

**Step 5**: Manually close a ledger

```bash
xrpld ledger_accept
Observe jobs related to ledger close:
jtADVANCE- Advance to next ledgerjtPUBLEDGER- Publish ledgerjtUPDATE_PF- Update path finding
Part 3: Add Custom Logging
Step 1: Modify Application.cpp
Add logging to track component initialization:
ApplicationImp::ApplicationImp(/* ... */)
{
    JLOG(j_.info()) << "Creating JobQueue...";
    jobQueue_ = std::make_unique<JobQueue>(/* ... */);
    JLOG(j_.info()) << "JobQueue created";

    JLOG(j_.info()) << "Creating NodeStore...";
    nodeStore_ = NodeStore::Manager::make(/* ... */);
    JLOG(j_.info()) << "NodeStore created";

    // Add similar logs for other components
}
Step 2: Recompile
cd rippled/build
cmake --build . --target xrpld
Step 3: Run and observe
./xrpld --conf=xrpld.cfg --standalone
You should see your custom log messages showing component creation order.
Analysis Questions
Answer these based on your exploration:
- What's the first subsystem created?
- Why does it need to be first?
- How does the job queue decide which job to process next?
- What factors influence priority?
- What happens if a job throws an exception?
- Find the exception handling code
- How many jobs are queued during a typical ledger close?
- Count from your logs
- What's the relationship between Application and ApplicationImp?
- Why use an interface?
- How would you add a new subsystem?
- What's the process?
- Where would you add it?
Additional Resources
Official Documentation
- XRP Ledger Dev Portal: xrpl.org/docs
- Rippled Setup: xrpl.org/install-rippled
- Configuration Reference: xrpl.org/rippled-server-configuration
Codebase References
src/xrpld/app/main- Application layer implementationinclude/xrpl/core/JobQueue.h- Job queue systemsrc/xrpld/core/Config.h- Configuration managementsrc/xrpld/app/main/Main.cpp- Program entry point
Related Topics
- Transactors - How transactions are processed
- Consensus Engine - How consensus integrates with Application
- Codebase Navigation - Finding your way around the code
Summary
This module explained how the Application class holds rippled together. It is the central orchestrator that constructs and owns every subsystem, from LedgerMaster and NetworkOPs to the Overlay and NodeStore, and hands them out on request (a service-locator pattern). You saw the node's startup, run, and shutdown sequence, how components reach one another through the Application, and how background work is scheduled on the job queue.
To remember:
Applicationis the service locator: components ask it for subsystems instead of constructing their own- Interface and
ApplicationImplive insrc/xrpld/app/main - Major subsystems: LedgerMaster, NetworkOPs, Overlay, NodeStore, JobQueue
- Reach them through accessors:
app.getLedgerMaster(),app.overlay(),app.getNodeStore() - Background work goes through the JobQueue (
include/xrpl/core/JobQueue.h):app.getJobQueue().addJob(...), priority-scheduled - Subsystems are constructed in dependency order at startup; shutdown unwinds in reverse
- All behaviour is configured from
xrpld.cfg, parsed intoConfig(src/xrpld/core) - Watch out: touching a subsystem before the Application finishes construction is the classic startup crash; respect the init order
Next up. You know who owns every subsystem; now you need to find them in two million lines of C++. Next: navigating the rippled codebase without getting lost.
Resources
Assignments
0 of 2 completeUnlocks
Finishing this module opens up: