
The transaction processing pipeline
The four-phase validation pipeline (preflight → preclaim → doApply → finalization) and what each phase may and may not do.
What you'll learn
- Walk the four phases and their access levels.
- Explain why `NotTEC` is returned from preflight.
- Understand how failures at each stage are handled.
Introduction
≈30 min · Advanced · builds on Transactor architecture
Every transaction runs a gauntlet before it can touch the ledger. In this module you'll walk the four-phase validation pipeline (preflight, preclaim, doApply and finalization) and learn exactly what each phase may and may not do, why preflight can never claim a fee, and how failures are handled at each stage. It's the beating heart of transaction processing, and the mental model behind every transactor you'll read.
Pipeline Overview
In brief: a transaction passes through four gates in order, and each gate has more access to the ledger, and more responsibility, than the last.
The pipeline has four distinct phases. Read the diagram top to bottom to follow a single transaction from arrival to commit:
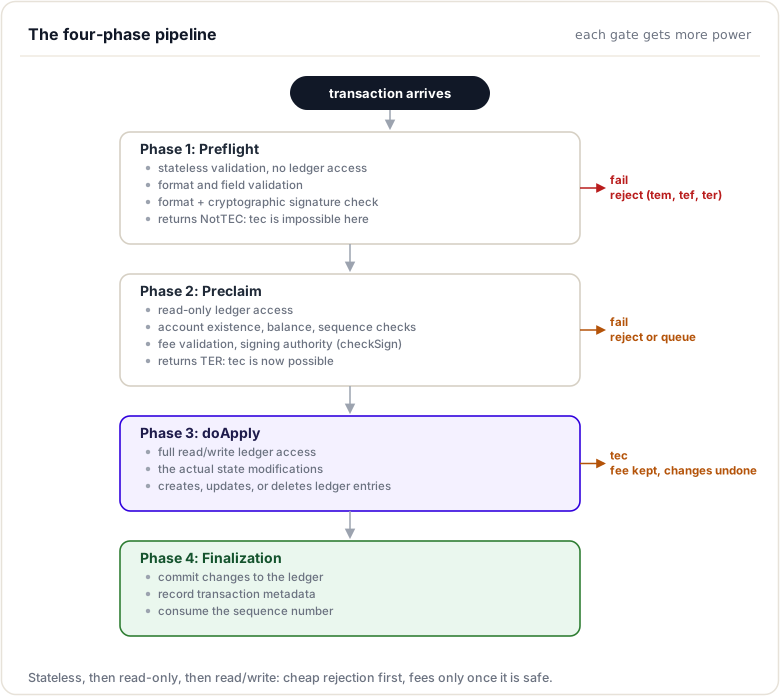
Key idea. Each gate has strictly more power than the one before it: stateless, then read-only, then read/write. That ordering is exactly what lets the node reject bad transactions cheaply, and only charge a fee once it is safe to.
Phase 1: Preflight
In brief: cheap, stateless checks on the transaction itself, run before anything expensive, and before a fee can ever be charged.
Preflight performs stateless validation, checks that depend only on the transaction content itself, not on any ledger state.
Characteristics
- No ledger access: Only has access to
PreflightContext(noview) - Deterministic: Same transaction always produces the same result
- Can run in parallel: No shared state dependencies
- Returns
NotTEC: Cannot returnteccodes (those require fee claiming)
What Preflight Checks
- Amendment/Feature enablement: Is the transaction type enabled?
- Flag validation: Are only valid flags set?
- Field presence: Are required fields present?
- Field format: Are field values well-formed?
- Field ranges: Are numeric values within valid ranges?
- Logical consistency: Are field combinations valid?
Implementation Pattern
Transaction-specific preflight is implemented as a static method. Notice that every check below reads only ctx.tx, never the ledger:
NotTEC
CheckCreate::preflight(PreflightContext const& ctx)
{
    // Check self-send
    if (ctx.tx[sfAccount] == ctx.tx[sfDestination])
    {
        JLOG(ctx.j.warn()) << "Malformed transaction: Check to self.";
        return temREDUNDANT;
    }

    // Validate SendMax
    STAmount const sendMax{ctx.tx.getFieldAmount(sfSendMax)};
    if (!isLegalNet(sendMax) || sendMax.signum() <= 0)
    {
        JLOG(ctx.j.warn()) << "Malformed transaction: bad sendMax amount";
        return temBAD_AMOUNT;
    }

    // Validate currency
    if (badCurrency() == sendMax.getCurrency())
    {
        JLOG(ctx.j.warn()) << "Malformed transaction: Bad currency.";
        return temBAD_CURRENCY;
    }

    // Validate expiration if present
    if (auto const optExpiry = ctx.tx[~sfExpiration])
    {
        if (*optExpiry == 0)
        {
            JLOG(ctx.j.warn()) << "Malformed transaction: bad expiration";
            return temBAD_EXPIRATION;
        }
    }

    return tesSUCCESS;
}
Why Preflight Matters
- Early rejection: Catches obviously invalid transactions before expensive operations
- Security: preflight1 runs before any signature work; preflight2 then does the cryptographic signature check, still stateless, so no ledger resources are touched for garbage input
- Cannot claim fees: Returns
NotTEC, so no fees can be claimed for malformed transactions
Watch out. Preflight cannot return
teccodes because those codes claim the transaction fee, and preflight has no ledger view to charge anything against. It is stateless by design:preflight1checks the format,preflight2checks that the signature is cryptographically valid, and neither can touch an account.
Phase 2: Preclaim
In brief: read-only checks against real ledger state. The signature's cryptographic validity was proven in preflight2; preclaim's checkSign now verifies the key's authority for the account (master key, regular key, or signer list). This is the first phase that can charge a fee.
Preclaim performs ledger-state validation with read-only access to the ledger.
Characteristics
- Read-only ledger access: Has
ReadView const& view - Signing authority verified:
checkSignconfirms the (already cryptographically valid) signature comes from a key allowed to sign for this account - Can return
teccodes: Fee can be claimed - Determines if transaction should be queued or applied
What Preclaim Checks
- Account existence: Does the sender account exist?
- Sequence number: Is the sequence correct?
- Fee adequacy: Is the fee sufficient?
- Balance sufficiency: Can the account pay the fee?
- Destination checks: Does destination exist? Are permissions met?
- Trust line state: Are trust lines frozen? Is authorization required?
- Expiration: Has the transaction or related object expired?
Implementation Pattern
The same transactor, one phase later. Now it reads ledger state through ctx.view (read-only), and can return tec codes:
TER
CheckCreate::preclaim(PreclaimContext const& ctx)
{
    // Check destination exists
    AccountID const dstId{ctx.tx[sfDestination]};
    auto const sleDst = ctx.view.read(keylet::account(dstId));
    if (!sleDst)
    {
        JLOG(ctx.j.warn()) << "Destination account does not exist.";
        return tecNO_DST;
    }

    auto const flags = sleDst->getFlags();

    // Check incoming permission
    if (ctx.view.rules().enabled(featureDisallowIncoming) &&
        (flags & lsfDisallowIncomingCheck))
        return tecNO_PERMISSION;

    // Check pseudo-account
    if (isPseudoAccount(sleDst))
        return tecNO_PERMISSION;

    // Check destination tag requirement
    if ((flags & lsfRequireDestTag) && !ctx.tx.isFieldPresent(sfDestinationTag))
    {
        JLOG(ctx.j.warn()) << "Malformed transaction: DestinationTag required.";
        return tecDST_TAG_NEEDED;
    }

    // Check freeze status for non-XRP amounts
    STAmount const sendMax{ctx.tx[sfSendMax]};
    if (!sendMax.native())
    {
        AccountID const& issuerId{sendMax.getIssuer()};
        if (isGlobalFrozen(ctx.view, issuerId))
        {
            JLOG(ctx.j.warn()) << "Creating a check for frozen asset";
            return tecFROZEN;
        }
        // Additional trust line freeze checks...
    }

    // Check expiration
    if (hasExpired(ctx.view, ctx.tx[~sfExpiration]))
    {
        JLOG(ctx.j.warn()) << "Creating a check that has already expired.";
        return tecEXPIRED;
    }

    return tesSUCCESS;
}
Key Utility Functions for Preclaim
These helpers do the read-only ledger lookups preclaim relies on:
| Function | Purpose |
|---|---|
ctx.view.read(keylet) |
Read a ledger entry |
isGlobalFrozen(view, issuer) |
Check if an issuer has globally frozen |
isFrozen(view, account, issue) |
Check if a specific trust line is frozen |
hasExpired(view, expiration) |
Check if a time has passed |
isPseudoAccount(sle) |
Check if account is a pseudo-account (AMM, etc.) |
Phase 3: doApply
In brief: the only phase that actually changes the ledger, and it does so all-or-nothing.
doApply performs the actual ledger modifications. This is where state changes happen.
Characteristics
- Full read/write access: Has
ApplyView& view() - Atomic execution: All changes succeed or all are reverted
- Can create, update, delete ledger entries
- Must handle reserve requirements
Implementation Pattern
The final phase. Watch it check the reserve first, then create the Check entry and wire it into the owner directories:
TER
CheckCreate::doApply()
{
    auto const sle = view().peek(keylet::account(accountID_));
    if (!sle)
        return tefINTERNAL;

    // Check reserve before creating new object
    STAmount const reserve{
        view().fees().accountReserve(sle->getFieldU32(sfOwnerCount) + 1)};

    if (preFeeBalance_ < reserve)
        return tecINSUFFICIENT_RESERVE;

    // Create the new ledger entry
    std::uint32_t const seq = ctx_.tx.getSeqValue();
    Keylet const checkKeylet = keylet::check(accountID_, seq);
    auto sleCheck = std::make_shared<SLE>(checkKeylet);

    // Set required fields
    sleCheck->setAccountID(sfAccount, accountID_);
    sleCheck->setAccountID(sfDestination, ctx_.tx[sfDestination]);
    sleCheck->setFieldU32(sfSequence, seq);
    sleCheck->setFieldAmount(sfSendMax, ctx_.tx[sfSendMax]);

    // Set optional fields
    if (auto const srcTag = ctx_.tx[~sfSourceTag])
        sleCheck->setFieldU32(sfSourceTag, *srcTag);
    if (auto const dstTag = ctx_.tx[~sfDestinationTag])
        sleCheck->setFieldU32(sfDestinationTag, *dstTag);
    if (auto const invoiceId = ctx_.tx[~sfInvoiceID])
        sleCheck->setFieldH256(sfInvoiceID, *invoiceId);
    if (auto const expiry = ctx_.tx[~sfExpiration])
        sleCheck->setFieldU32(sfExpiration, *expiry);

    // Insert into ledger
    view().insert(sleCheck);

    // Add to owner directories
    auto const page = view().dirInsert(
        keylet::ownerDir(accountID_),
        checkKeylet,
        describeOwnerDir(accountID_));
    if (!page)
        return tecDIR_FULL;
    sleCheck->setFieldU64(sfOwnerNode, *page);

    // Update owner count
    adjustOwnerCount(view(), sle, 1, ctx_.app.journal("View"));

    return tesSUCCESS;
}
Key Operations in doApply
The read/write operations a transactor uses to change ledger state:
| Operation | Method | Description |
|---|---|---|
| Read entry | view().peek(keylet) |
Get modifiable reference to entry |
| Create entry | view().insert(sle) |
Add new entry to ledger |
| Update entry | view().update(sle) |
Mark entry as modified |
| Delete entry | view().erase(sle) |
Remove entry from ledger |
| Add to directory | view().dirInsert(...) |
Add entry to owner directory |
| Update owner count | adjustOwnerCount(...) |
Increment/decrement owner count |
Phase 4: Finalization
In brief: the engine, not your transactor, charges the fee, bumps the sequence, and commits (or reverts) the result.
After doApply succeeds (or fails with a tec code), the transaction is finalized:
- Fee consumption: Transaction fee is deducted from the sender
- Sequence advancement: Account sequence number is incremented
- Metadata recording: Changes are recorded in transaction metadata
- State commitment: Changes are committed to the ledger (or reverted for
tec)
This phase is handled by the engine, not by individual transactors.
Error Propagation
In brief: which result codes each phase may return, and exactly when a fee sticks.
Different phases can return different categories of result codes:
| Phase | Can Return | Fee Charged? | Notes |
|---|---|---|---|
| Preflight | tem*, tef*, ter*, tes |
No | No tec codes allowed |
| Preclaim | All codes | For tec* only |
May queue for ter* |
| doApply | All codes | For tec*, tes |
Changes reverted for tec* |
Practical Example: Tracing a CheckCreate
In brief: the same CheckCreate followed gate by gate, so you can watch the theory run.
Take this transaction and follow it through all four phases:
Transaction: CheckCreate
  Account: rAlice
  Destination: rBob
  SendMax: 100 XRP
  Expiration: 750000000
Preflight:
- Check
rAlice != rBob→ Pass - Validate
100 XRPis positive and legal → Pass - Validate expiration
750000000 != 0→ Pass - Result:
tesSUCCESS
Preclaim:
- Read Bob's account → Exists
- Check
lsfDisallowIncomingCheck→ Not set - Check
isPseudoAccount(Bob)→ False - Check
lsfRequireDestTag→ Not set (or tag provided) - Check
isGlobalFrozen(XRP)→ XRP can't be frozen, skip - Check
hasExpired(750000000)→ Not expired - Result:
tesSUCCESS
doApply:
- Read Alice's account (peek)
- Calculate reserve for +1 owner count → e.g., 12 XRP
- Check
preFeeBalance_ >= reserve→ Pass - Create Check SLE with all fields
- Insert Check into ledger
- Add to Bob's owner directory → Get page number
- Add to Alice's owner directory → Get page number
- Increment Alice's owner count
- Result:
tesSUCCESS
Finalization:
- Deduct fee from Alice
- Increment Alice's sequence
- Record metadata
- Commit changes
Best Practices for Implementing Transactors
In brief: the habits that keep a transactor correct, cheap, and safe.
- Preflight should be stateless: Never access ledger state in preflight
- Fail early: Check the cheapest conditions first
- Use appropriate error codes:
tem*for format errors,tec*for state-dependent failures - Check reserves before creating objects: Use
preFeeBalance_for reserve checks - Always update owner count: When creating or deleting owned objects
- Always update directories: Add/remove from owner directories
- Log warnings: Use
JLOGto help with debugging
Codebase References
Where this pipeline lives in the source:
| File | Description |
|---|---|
src/libxrpl/tx/applySteps.cpp |
Transaction dispatch and phase orchestration |
src/libxrpl/tx/apply.cpp |
Core apply logic |
src/libxrpl/tx/Transactor.cpp |
Base class phase implementations |
Summary
This module walked the four-phase validation pipeline: preflight (stateless), preclaim (read-only state), doApply (read/write state), and finalization. You learned exactly what each phase may and may not do, why preflight can never claim a fee (it is stateless, with no ledger to charge against), how the signature is checked in two layers (cryptographic validity in preflight2, signing authority in preclaim's checkSign), and how failures are handled at each stage, with the fee sticking only from preclaim onward. Each gate has strictly more access than the one before, which is what makes early rejection cheap and safe.
To remember:
- Order: preflight, then preclaim, then doApply, then finalization; each gate has strictly more access
- preflight: stateless; preflight1 checks format, preflight2 checks the signature cryptographically; returns
NotTEC(notecpossible) - preclaim: read-only ledger view;
checkSignverifies signing authority (master/regular/signer list); can returntec - doApply: the only writer, all-or-nothing through the ApplyView
- Finalization is engine work, not the transactor's: fee, sequence, metadata, commit
- A fee is charged only for
tesandtecoutcomes - Dispatch:
src/libxrpl/tx/applySteps.cpp; shared phase logic:src/libxrpl/tx/Transactor.cpp - Watch out:
tecfrom preflight would let attackers drain fees with unsigned junk; that is exactly whyNotTECexists
Next up. The gates are clear; now look at what every passage costs. Next: state modification, fees and sequences, the bookkeeping that no transaction escapes.
Resources
Assignments
0 of 2 complete