
Transactor architecture
The `Transactor` base class and framework — contexts, phases, and how every transaction type extends a shared base.
What you'll learn
- Describe the Transactor base class and its members (`accountID_`, `preFeeBalance_`…).
- Distinguish PreflightContext / PreclaimContext / ApplyContext.
- Understand the ConsequencesFactory and the transactor hierarchy.
Introduction
≈90 min · Advanced · builds on Caching & resource management
Watch this short video by XRPL Commons first, then dive into the details below.
You've seen a transaction's journey from the outside, now let's meet the code that carries it out. In this module you'll learn the Transactor base class that every transaction type extends, the contexts that back each phase (PreflightContext, PreclaimContext, ApplyContext), and the shape of the transactor hierarchy. It's the framework you'll be building inside when you write your own transaction type later.
The Transactor Base Class
In brief: the shared base that every transaction type extends, holding common state and helpers.
Architecture Overview
Every transaction type in Rippled inherits from the Transactor base class, which provides the fundamental framework for transaction processing. This inheritance model ensures consistent behavior across all transaction types while allowing each type to implement its specific business logic.
The base Transactor class is defined in include/xrpl/tx/Transactor.h and provides:
- Common validation logic - Signature verification, fee checks, sequence number validation
- Helper methods - Account balance queries, ledger state access, fee calculation
- Virtual methods - Hooks for transaction-specific logic (preflight, preclaim, doApply)
- Transaction context - Access to the ledger, transaction data, and application state
Base Class Structure
class Transactor
{
public:
    // Main entry point for transaction application
    static std::pair<TER, bool>
    apply(Application& app, OpenView& view, STTx const& tx, ApplyFlags flags);

    // Virtual methods for transaction-specific logic
    static NotTEC preflight(PreflightContext const& ctx);
    static TER preclaim(PreclaimContext const& ctx);
    virtual TER doApply() = 0;

protected:
    // Constructor - available to derived classes
    Transactor(ApplyContext& ctx);

    // Helper methods
    TER payFee();
    TER checkSeq();
    TER checkSign(PreclaimContext const& ctx);

    // Member variables
    ApplyContext& ctx_;
    beast::Journal j_;
    AccountID accountID_;
    XRPAmount preFeeBalance_;
};
Key Concepts
ApplyContext: Provides access to the transaction being processed, the ledger view, and application services. This context object is passed through all stages of transaction processing.
Transaction Engine Result (TER): Every validation step returns a TER code indicating success (tesSUCCESS), temporary failure (ter codes), or permanent failure (tem or tef codes). These codes determine whether a transaction can be retried or should be permanently rejected.
Ledger Views: Transactors work with "views" of the ledger state, allowing tentative modifications that can be committed or rolled back. This ensures atomic transaction processing.
Key idea. Every transaction type inherits from
Transactor. Learn the base once and you understand the skeleton of every transaction on the ledger.
Three-Phase Validation Process
In brief: preflight, preclaim and doApply, each with its own context object.
The transactor framework implements a rigorous three-phase validation process. Each phase has a specific purpose and access to different levels of information, creating a defense-in-depth approach to transaction validation.
Phase 1: Preflight
Purpose: Static validation that doesn't require ledger state
Access: Only the raw transaction data and protocol rules
When It Runs: Before any ledger state is accessed, can run in parallel
What It Checks:
- Transaction format is valid
- Required fields are present
- Field values are within valid ranges
- Amounts are positive and properly formatted
- No malformed or contradictory data
Key Characteristic: Preflight checks are deterministic and stateless, they depend only on the transaction itself, not on current ledger state.
Preflight Example: Payment Transaction
NotTEC Payment::preflight(PreflightContext const& ctx)
{
    // Note: Payment itself has NO amendment gate (it predates amendments).
    // Newer transactors start with one, e.g. in AMMCreate:
    //     if (!ctx.rules.enabled(featureAMM))
    //         return temDISABLED;

    // Call base class preflight checks
    auto const ret = preflight1(ctx);
    if (!isTesSuccess(ret))
        return ret;

    // Verify destination account is specified
    if (!ctx.tx.isFieldPresent(sfDestination))
        return temDST_NEEDED;

    // Verify amount is specified and valid
    auto const amount = ctx.tx[sfAmount];
    if (!amount)
        return temBAD_AMOUNT;

    // Amount must be positive
    if (amount <= zero)
        return temBAD_AMOUNT;

    // Check for valid currency code if not XRP
    if (!isXRP(amount))
    {
        if (!amount.issue().currency)
            return temBAD_CURRENCY;
    }

    // Additional format validations...
    return preflight2(ctx);
}
Why Preflight Matters: By catching format errors early, preflight prevents wasting resources on obviously invalid transactions. It also provides fast feedback to clients about transaction formatting issues.
Phase 2: Preclaim
Purpose: Validation requiring read-only access to ledger state
Access: Current ledger state (read-only), transaction data, protocol rules
When It Runs: After preflight passes, but before any state modifications
What It Checks:
- Source account exists and has sufficient balance
- Destination account exists (or can be created)
- Required authorizations are in place
- Trust lines exist for non-XRP currencies
- Account flags and settings permit the transaction
- Sequence numbers are correct
Key Characteristic: Preclaim can read ledger state but cannot modify it. This allows for safe concurrent execution and caching of preclaim results.
Preclaim Example: Payment Transaction
TER Payment::preclaim(PreclaimContext const& ctx)
{
    // Get source and destination account IDs
    AccountID const src = ctx.tx[sfAccount];
    AccountID const dst = ctx.tx[sfDestination];

    // Source and destination cannot be the same
    if (src == dst)
        return temREDUNDANT;

    // Check if destination account exists
    auto const dstID = ctx.tx[sfDestination];
    auto const sleDst = ctx.view.read(keylet::account(dstID));

    // If destination doesn't exist, check if we can create it
    if (!sleDst)
    {
        auto const amount = ctx.tx[sfAmount];

        // Only XRP can create accounts
        if (!isXRP(amount))
            return tecNO_DST;

        // Amount must meet reserve requirement
        if (amount < ctx.view.fees().accountReserve(0))
            return tecNO_DST_INSUF_XRP;
    }
    else
    {
        // Destination exists - check if it requires dest tag
        auto const flags = sleDst->getFlags();

        if (flags & lsfRequireDestTag)
        {
            // Destination requires a tag but none provided
            if (!ctx.tx.isFieldPresent(sfDestinationTag))
                return tecDST_TAG_NEEDED;
        }

        // Check if destination has disallowed XRP
        if (flags & lsfDisallowXRP && isXRP(ctx.tx[sfAmount]))
            return tecNO_TARGET;
    }

    // Check source account balance
    auto const sleSrc = ctx.view.read(keylet::account(src));
    if (!sleSrc)
        return terNO_ACCOUNT;

    auto const balance = (*sleSrc)[sfBalance];
    auto const amount = ctx.tx[sfAmount];

    // Ensure sufficient balance (including fee)
    if (balance < amount + ctx.tx[sfFee])
        return tecUNFUNDED_PAYMENT;

    return tesSUCCESS;
}
Why Preclaim Matters: Preclaim catches state-dependent errors before attempting state modifications. This prevents partially-applied transactions and provides clear error messages about why a transaction cannot succeed.
Phase 3: DoApply
Purpose: Actual ledger state modification
Access: Full read/write access to ledger state
When It Runs: After both preflight and preclaim succeed
What It Does:
- Debits source account
- Credits destination account
- Creates or modifies ledger objects
- Applies transaction-specific business logic
- Records transaction metadata
- Consumes transaction fee
Key Characteristic: DoApply modifies ledger state. All changes are atomic, either the entire transaction succeeds and all changes are applied, or it fails and no changes are made.
DoApply Example: Payment Transaction
The fee is not paid here: Transactor::apply() already called payFee() before invoking your doApply (see src/libxrpl/tx/Transactor.cpp). A derived transactor never touches the fee.
TER Payment::doApply()
{
    // Get amount to send
    auto const amount = ctx_.tx[sfAmount];
    auto const dst = ctx_.tx[sfDestination];

    // Perform the actual transfer
    auto const transferResult = accountSend(
        view(),           // Ledger view to modify
        accountID_,         // Source account
        dst,              // Destination account
        amount,           // Amount to transfer
        j_                // Journal for logging
    );

    if (transferResult != tesSUCCESS)
        return transferResult;

    // Handle partial payments and path finding if applicable
    if (ctx_.tx.isFlag(tfPartialPayment))
    {
        // Partial payment logic...
    }

    // Record transaction metadata
    ctx_.deliver(amount);

    return tesSUCCESS;
}
Why DoApply Matters: This is where the actual ledger state changes happen. DoApply ensures that only transactions that have passed all validation steps can modify the ledger, maintaining data integrity.
Transaction Types in Detail
In brief: how concrete transactors (Payment, OfferCreate, Escrow, and more) specialize the base.
The XRP Ledger supports numerous transaction types, each implemented as a specific transactor. Understanding the most common types helps you navigate the codebase and understand protocol capabilities.
Payment
File: src/libxrpl/tx/transactors/payment/Payment.cpp
Purpose: Transfer XRP or issued currencies between accounts
Key Features:
- Direct XRP transfers
- Issued currency transfers via trust lines
- Path-based payments (automatic currency conversion)
- Partial payments (deliver less than requested if full amount unavailable)
Common Fields:
Account- Source accountDestination- Recipient accountAmount- Amount to deliverSendMax(optional) - Maximum amount to sendPaths(optional) - Payment paths for currency conversionDestinationTag(optional) - Identifier for the recipient
Use Cases:
- Simple XRP transfers
- Issued currency payments
- Cross-currency payments
- Payment channel settlements
OfferCreate
File: src/libxrpl/tx/transactors/dex/OfferCreate.cpp
Purpose: Place an offer on the decentralized exchange (DEX)
Key Features:
- Buy or sell any currency pair
- Immediate-or-cancel orders
- Fill-or-kill orders
- Passive offers (don't consume existing offers)
- Auto-bridging via XRP
Common Fields:
TakerPays- Asset the taker (matcher) paysTakerGets- Asset the taker receivesExpiration(optional) - When offer expiresOfferSequence(optional) - Sequence of offer to replace
Use Cases:
- Currency exchange
- Market making
- Arbitrage
- Limit orders
OfferCancel
File: src/libxrpl/tx/transactors/dex/OfferCancel.cpp
Purpose: Remove an offer from the order book
Key Features:
- Cancel by offer sequence number
- Only offer owner can cancel
Common Fields:
OfferSequence- Sequence number of offer to cancel
TrustSet
File: src/libxrpl/tx/transactors/token/TrustSet.cpp
Purpose: Create or modify a trust line for issued currencies
Key Features:
- Set trust limit for a currency
- Authorize/deauthorize trust lines
- Configure trust line flags
Common Fields:
LimitAmount- Trust line limit and currencyQualityIn(optional) - Exchange rate for incoming transfersQualityOut(optional) - Exchange rate for outgoing transfers
Use Cases:
- Accept issued currencies
- Set credit limits
- Freeze trust lines
EscrowCreate
File: src/libxrpl/tx/transactors/escrow/EscrowCreate.cpp
Purpose: Lock XRP until conditions are met
Key Features:
- Time-based release (CryptoConditions)
- Conditional release (Interledger Protocol conditions)
- Guaranteed delivery or return
Common Fields:
Destination- Who can claim the escrowAmount- Amount of XRP to escrowFinishAfter(optional) - Earliest finish timeCancelAfter(optional) - When escrow can be cancelledCondition(optional) - Cryptographic condition for release
EscrowFinish
File: src/libxrpl/tx/transactors/escrow/EscrowFinish.cpp
Purpose: Complete an escrow and deliver XRP
Key Features:
- Must meet time and/or condition requirements
- Can be executed by anyone (typically destination)
Common Fields:
Owner- Account that created the escrowOfferSequence- Sequence of EscrowCreate transactionFulfillment(optional) - Fulfillment of cryptographic condition
EscrowCancel
File: src/libxrpl/tx/transactors/escrow/EscrowCancel.cpp
Purpose: Return escrowed XRP to owner
Key Features:
- Only after CancelAfter time passes
- Can be executed by anyone
AccountSet
File: src/libxrpl/tx/transactors/account/AccountSet.cpp
Purpose: Modify account settings and flags
Key Features:
- Set account flags
- Configure transfer rate
- Set domain and message key
- Configure email hash
Common Fields:
SetFlag/ClearFlag- Flags to modifyTransferRate(optional) - Fee for transferring issued currenciesDomain(optional) - Domain associated with accountMessageKey(optional) - Public key for encrypted messaging
Important Flags:
asfRequireDest- Require destination tagasfRequireAuth- Require authorization for trust linesasfDisallowXRP- Disallow XRP paymentsasfDefaultRipple- Enable rippling by default
SignerListSet
File: src/libxrpl/tx/transactors/account/SignerListSet.cpp
Purpose: Create or modify multi-signature configuration
Key Features:
- Define list of authorized signers
- Set signing quorum
- Enable complex authorization schemes
Common Fields:
SignerQuorum- Required signature weightSignerEntries- List of authorized signers with weights
PaymentChannelCreate
File: src/libxrpl/tx/transactors/payment_channel/PaymentChannelCreate.cpp
Purpose: Open a unidirectional payment channel
Key Features:
- Lock XRP for fast, off-ledger payments
- Asynchronous payments with cryptographic claims
- Efficient micropayments
Creating Custom Transactors
In brief: the steps to add a brand-new transaction type to the protocol.
When implementing new features through amendments, you'll often need to create custom transactors. Here's the complete process:
Step 1: Define Transaction Format
Add your transaction type to src/libxrpl/protocol/TxFormats.cpp:
add(jss::MyCustomTx,
    ttMY_CUSTOM_TX,
    {
        // Required fields
        {sfAccount,         SoeRequired},
        {sfDestination,     SoeRequired},
        {sfCustomField,     SoeRequired},

        // Optional fields
        {sfOptionalField,   SoeOptional},
    },
    commonFields);
Step 2: Create Transactor Class
Create include/xrpl/tx/transactors/MyCustomTx.h:
#ifndef RIPPLE_TX_MYCUSTOMTX_H_INCLUDED
#define RIPPLE_TX_MYCUSTOMTX_H_INCLUDED

#include <xrpl/tx/Transactor.h>

namespace xrpl {

class MyCustomTx : public Transactor
{
public:
    static constexpr ConsequencesFactoryType ConsequencesFactory{Normal};

    explicit MyCustomTx(ApplyContext& ctx) : Transactor(ctx) {}

    static NotTEC preflight(PreflightContext const& ctx);
    static TER preclaim(PreclaimContext const& ctx);
    TER doApply() override;
};

} // namespace xrpl

#endif
Step 3: Implement Preflight
Create src/libxrpl/tx/transactors/MyCustomTx.cpp:
#include <xrpl/tx/transactors/MyCustomTx.h>
#include <xrpl/basics/Log.h>
#include <xrpl/protocol/Feature.h>

namespace xrpl {

NotTEC MyCustomTx::preflight(PreflightContext const& ctx)
{
    // Check if amendment is enabled
    if (!ctx.rules.enabled(featureMyCustomTx))
        return temDISABLED;

    // Perform base class preflight checks
    auto const ret = preflight1(ctx);
    if (!isTesSuccess(ret))
        return ret;

    // Validate custom field format
    if (!ctx.tx.isFieldPresent(sfCustomField))
        return temMALFORMED;

    auto const customValue = ctx.tx[sfCustomField];
    if (customValue < 0 || customValue > 1000000)
        return temBAD_AMOUNT;

    // Additional validation...

    return preflight2(ctx);
}
Step 4: Implement Preclaim
TER MyCustomTx::preclaim(PreclaimContext const& ctx)
{
    // Get account IDs
    AccountID const src = ctx.tx[sfAccount];
    AccountID const dst = ctx.tx[sfDestination];

    // Verify destination account exists
    auto const sleDst = ctx.view.read(keylet::account(dst));
    if (!sleDst)
        return tecNO_DST;

    // Check source account has sufficient balance
    auto const sleSrc = ctx.view.read(keylet::account(src));
    if (!sleSrc)
        return terNO_ACCOUNT;

    auto const balance = (*sleSrc)[sfBalance];
    auto const fee = ctx.tx[sfFee];

    if (balance < fee)
        return tecUNFUNDED;

    // Additional state-based validation...

    return tesSUCCESS;
}
Step 5: Implement DoApply
TER MyCustomTx::doApply()
{
    // (fee already charged by Transactor::apply() before we get here)

    // Get transaction fields
    auto const dst = ctx_.tx[sfDestination];
    auto const customValue = ctx_.tx[sfCustomField];

    // Perform custom logic
    // Example: Create a new ledger object
    auto const sleNew = std::make_shared<SLE>(
        keylet::custom(accountID_, ctx_.tx.getSeqProxy().value()));

    sleNew->setAccountID(sfAccount, accountID_);
    sleNew->setAccountID(sfDestination, dst);
    sleNew->setFieldU32(sfCustomField, customValue);

    // Insert into ledger
    view().insert(sleNew);

    // Log the operation
    JLOG(j_.trace()) << "MyCustomTx applied successfully";

    return tesSUCCESS;
}

} // namespace xrpl
Step 6: Register the Transactor
Add to src/libxrpl/tx/applySteps.cpp:
#include <xrpl/tx/transactors/MyCustomTx.h>

// In the invoke function, add:
case ttMY_CUSTOM_TX:
    return MyCustomTx::makeTxConsequences(ctx);
Step 7: Write Tests
Create src/test/app/MyCustomTx_test.cpp:
#include <xrpl/protocol/Feature.h>
#include <xrpl/protocol/jss.h>
#include <test/jtx.h>

namespace xrpl {
namespace test {

class MyCustomTx_test : public beast::unit_test::suite
{
public:
    void testBasicOperation()
    {
        using namespace jtx;
        Env env(*this, supported_amendments() | featureMyCustomTx);

        // Create test accounts
        Account const alice{"alice"};
        Account const bob{"bob"};
        env.fund(XRP(10000), alice, bob);

        // Submit custom transaction
        Json::Value jv;
        jv[jss::Account] = alice.human();
        jv[jss::Destination] = bob.human();
        jv[jss::TransactionType] = jss::MyCustomTx;
        jv[jss::CustomField] = 12345;
        jv[jss::Fee] = "10";

        env(jv);
        env.close();

        // Verify results
        // Add assertions...
    }

    void run() override
    {
        testBasicOperation();
        // More tests...
    }
};

BEAST_DEFINE_TESTSUITE(MyCustomTx, app, xrpl);

} // namespace test
} // namespace xrpl
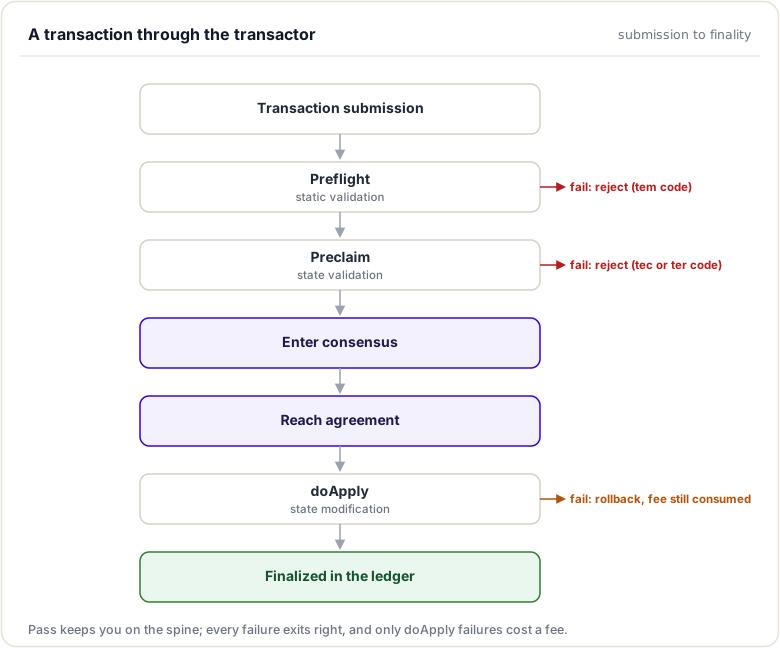
Transaction Lifecycle Within Framework
Understanding how a transaction flows through the transactor framework helps debug issues and optimize performance.
Complete Flow Diagram
Error Code Categories
tem (Malformed): Transaction is permanently invalid due to format issues
- Example:
temMALFORMED,temBAD_AMOUNT,temDISABLED - Action: Reject immediately, never retry
tef (Failure): Transaction failed during local checks
- Example:
tefFAILURE,tefPAST_SEQ - Action: Reject, may indicate client error
ter (Retry): Transaction failed but might succeed later
- Example:
terQUEUED,terPRE_SEQ - Action: Can be retried after conditions change
tec (Claimed Fee): Transaction failed but consumed fee
- Example:
tecUNFUNDED,tecNO_DST,tecNO_PERMISSION - Action: Failed permanently, fee charged
tes (Success): Transaction succeeded
- Example:
tesSUCCESS - Action: Changes committed to ledger
Set requireDestTag flag on destination account
xrpld submit '{ "TransactionType": "AccountSet", "Account": "<address2>", "SetFlag": 1, "Fee": "12" }'
**Step 4**: Try payment without destination tag

```bash
# This should fail with tecDST_TAG_NEEDED
xrpld submit '{
  "TransactionType": "Payment",
  "Account": "<address1>",
  "Destination": "<address2>",
  "Amount": "1000000",
  "Fee": "12"
}'
Step 5: Try payment with destination tag
# This should succeed
xrpld submit '{
  "TransactionType": "Payment",
  "Account": "<address1>",
  "Destination": "<address2>",
  "Amount": "1000000",
  "DestinationTag": 12345,
  "Fee": "12"
}'
Part 3: Modify the Transactor (Advanced)
Step 1: Add custom logging
Edit Payment.cpp and add logging to doApply():
TER Payment::doApply()
{
    JLOG(j_.info()) << "Payment doApply started";
    JLOG(j_.info()) << "Source: " << accountID_;
    JLOG(j_.info()) << "Destination: " << ctx_.tx[sfDestination];
    JLOG(j_.info()) << "Amount: " << ctx_.tx[sfAmount];

    // ... existing code ...
}
Step 2: Recompile rippled
cd rippled/build
cmake --build . --target xrpld
Step 3: Run with your modified code
./xrpld --conf=xrpld.cfg --standalone
Step 4: Submit a payment and observe your logs
Analysis Questions
Answer these based on your exploration:
- What happens in each validation phase?
- List the checks performed in preflight
- List the checks performed in preclaim
- What state modifications occur in doApply?
- How are transaction fees handled?
- Where is
payFee()called? - What happens if an account can't pay the fee?
- How does the code handle XRP vs issued currencies?
- Find the code that distinguishes between them
- How do payment paths work for issued currencies?
- What's the role of the
accountSend()helper?
- Where is it implemented?
- What does it do internally?
Additional Resources
Official Documentation
- XRP Ledger Dev Portal: xrpl.org/docs
- Transaction Types: xrpl.org/transaction-types
- Create Custom Transactors: xrpl.org/create-custom-transactors
Codebase References
src/libxrpl/tx/transactors- All transactor implementationsinclude/xrpl/tx/Transactor.h- Base transactor classsrc/libxrpl/protocol/TxFormats.cpp- Transaction format definitionsinclude/xrpl/protocol/TER.h- Transaction result codes
Related Topics
- Protocols - How transactions are propagated across the network
- Transaction Lifecycle - Complete journey from submission to ledger
- Application Layer - How transactors integrate with the overall system
Transactor Architecture
Introduction
Every transaction that modifies the XRP Ledger, whether it's a payment, an offer, a trust line, or any other operation, is processed by a Transactor. The transactor architecture provides a consistent, safe, and extensible framework for implementing transaction types while ensuring that the ledger remains in a valid state.
Understanding this architecture is essential for anyone who wants to implement new transaction types, debug validation failures, or contribute to the rippled codebase. This section explores the layered design of the transaction engine and how each component contributes to the safety and correctness of ledger modifications.
The Transactor Base Class
The Transactor class, defined in include/xrpl/tx/Transactor.h, is the foundation of all transaction processing in rippled. Every transaction type inherits from this base class, which provides:
- Common validation logic: Signature verification, fee checks, sequence number validation
- Helper methods: Account balance queries, ledger state access, fee calculation
- Virtual methods: Hooks for transaction-specific logic (preflight, preclaim, doApply)
- Transaction context: Access to the ledger view, transaction data, and application state
Core Class Structure
class Transactor
{
protected:
    ApplyContext& ctx_;
    beast::WrappedSink sink_;
    beast::Journal const j_;

    AccountID const accountID_;
    XRPAmount preFeeBalance_{};  // Balance before fees.

public:
    enum class ConsequencesFactoryType { Normal, Blocker, Custom };

    // Main entry point for transaction application
    ApplyResult operator()();

    ApplyView& view();
    ApplyView const& view() const;

    // Static methods for validation phases
    static NotTEC checkSeqProxy(ReadView const& view, STTx const& tx, beast::Journal j);
    static NotTEC checkPriorTxAndLastLedger(PreclaimContext const& ctx);
    static TER checkFee(PreclaimContext const& ctx, XRPAmount baseFee);
    static NotTEC checkSign(PreclaimContext const& ctx);
    static XRPAmount calculateBaseFee(ReadView const& view, STTx const& tx);

    // Default implementations that derived classes can override
    static TER preclaim(PreclaimContext const& ctx) { return tesSUCCESS; }

protected:
    TER apply();
    explicit Transactor(ApplyContext& ctx);

    virtual void preCompute();
    virtual TER doApply() = 0;  // Pure virtual - must be implemented
};
Key observations:
doApply()is pure virtual: Every transaction type must implement this methodpreclaim()has a default implementation: ReturnstesSUCCESS, can be overriddenpreFeeBalance_: Tracks the account's XRP balance before fees are deductedctx_: TheApplyContextprovides access to the transaction, view, and application
Context Objects
The transactor framework uses three context objects that provide different levels of access at each processing phase:
PreflightContext
Used during the preflight phase for stateless validation:
struct PreflightContext
{
    Application& app;
    STTx const& tx;
    Rules const rules;
    ApplyFlags flags;
    beast::Journal const j;
};
What it provides:
- Access to the raw transaction (
tx) - Protocol rules that are currently enabled (
rules) - Application flags (
flags) - Logging journal (
j)
What it does NOT provide:
- Any ledger state (no
view)
This limitation is intentional, preflight checks must be stateless and deterministic based solely on the transaction content.
PreclaimContext
Used during the preclaim phase for read-only ledger validation:
struct PreclaimContext
{
    Application& app;
    ReadView const& view;
    TER preflightResult;
    ApplyFlags flags;
    STTx const& tx;
    beast::Journal const j;
};
What it provides:
- Read-only access to the ledger (
view) - The result from preflight (
preflightResult) - Transaction and application context
Key distinction: The view is ReadView const&, you can read ledger state but cannot modify it.
ApplyContext
Used during the doApply phase for ledger modification:
class ApplyContext
{
public:
    Application& app;
    ApplyView& view();
    STTx const& tx;
    beast::Journal journal;
    // ... additional methods
};
What it provides:
- Full read/write access to the ledger via
view() - Transaction data and application services
- Methods for delivering amounts, tracking metadata
Transaction Type Registration
New transaction types must be registered with the transaction engine. This is done through a combination of:
- Transaction format definition in
src/libxrpl/protocol/TxFormats.cpp - Transactor class implementation in
src/libxrpl/tx/transactors - Registration in
applySteps.cpp
Example: CheckCreate Registration
In TxFormats.cpp:
add(jss::CheckCreate,
    ttCHECK_CREATE,
    {
        {sfDestination,     SoeRequired},
        {sfSendMax,         SoeRequired},
        {sfExpiration,      SoeOptional},
        {sfDestinationTag,  SoeOptional},
        {sfInvoiceID,       SoeOptional},
    },
    commonFields);
This defines:
- The JSON name (
jss::CheckCreate) - The transaction type enum (
ttCHECK_CREATE) - Required and optional fields
- Common fields inherited by all transactions
The Transactor Hierarchy
All specific transaction types inherit from Transactor and implement their own validation logic:
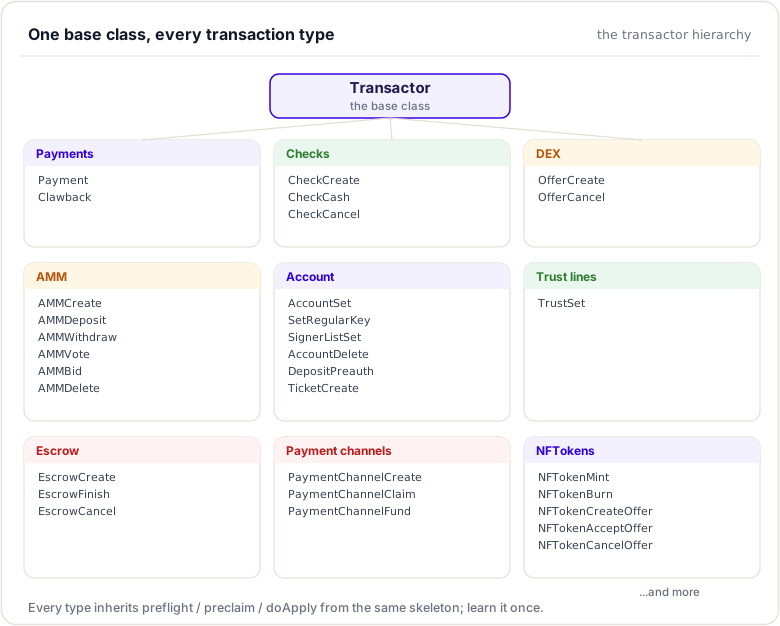
Each derived class typically implements:
preflight(): Static method for stateless validationpreclaim(): Static method for ledger-state validationdoApply(): Instance method for applying changes
The invokePreflight Template
The base class provides a template method that orchestrates the preflight phase:
template <class T>
NotTEC
Transactor::invokePreflight(PreflightContext const& ctx)
{
    // 1. Check if the transaction type's feature is enabled
    auto const feature =
        Permission::getInstance().getTxFeature(ctx.tx.getTxnType());
    if (feature && !ctx.rules.enabled(*feature))
        return temDISABLED;

    // 2. Check any extra features the transaction requires
    if (!T::checkExtraFeatures(ctx))
        return temDISABLED;

    // 3. Run preflight1 (account, fee, flags validation)
    if (auto const ret = preflight1(ctx, T::getFlagsMask(ctx)))
        return ret;

    // 4. Run the transaction-specific preflight
    if (auto const ret = T::preflight(ctx))
        return ret;

    // 5. Run preflight2 (signature validation)
    if (auto const ret = preflight2(ctx))
        return ret;

    // 6. Run any post-signature validation
    return T::preflightSigValidated(ctx);
}
This template ensures consistent ordering of validation steps across all transaction types.
Key Member Variables
account_
The AccountID of the transaction sender, extracted from the sfAccount field:
AccountID const accountID_;
This is set during construction and used throughout transaction processing.
preFeeBalance_
XRPAmount preFeeBalance_{}; // Balance before fees
This records the sender's XRP balance at the start of transaction processing, before the
fee is deducted. It is used for reserve calculations, the reserve is checked against
preFeeBalance_ to allow accounts to dip into their reserve to pay the transaction fee. The
fee is charged, and the post-fee balance written to the ledger, by the base class itself.
ctx_
ApplyContext& ctx_;
The ApplyContext provides access to:
ctx_.tx: The transaction being processedctx_.view(): The ledger view for reading/writingctx_.app: The application instancectx_.journal: Logging
Helper Methods
The base class provides several helper methods used by derived transactors:
view()
ApplyView& view() { return ctx_.view(); }
Returns the ledger view for reading and modifying ledger state.
calculateBaseFee()
static XRPAmount calculateBaseFee(ReadView const& view, STTx const& tx);
Calculates the base transaction fee based on the transaction type and current fee settings.
minimumFee()
static XRPAmount minimumFee(
    Application& app,
    XRPAmount baseFee,
    Fees const& fees,
    ApplyFlags flags);
Calculates the minimum fee required considering current load and fee escalation.
Codebase References
| File | Description |
|---|---|
include/xrpl/tx/Transactor.h |
Base Transactor class definition |
src/libxrpl/tx/Transactor.cpp |
Base class implementation |
include/xrpl/tx/ApplyContext.h |
ApplyContext definition |
src/libxrpl/tx/applySteps.cpp |
Transaction type dispatch |
src/libxrpl/protocol/TxFormats.cpp |
Transaction format definitions |
Summary
This module introduced the transactor framework. Every transaction type derives from the shared Transactor base class and runs the same three phases, each with its own context: PreflightContext, PreclaimContext, and ApplyContext. You saw how concrete transactors (Payment, OfferCreate, Escrow, and others) specialise the base, the role of members like preFeeBalance_, and the steps to add a brand-new transaction type.
To remember:
- Every transaction type extends
Transactor(include/xrpl/tx/Transactor.h) - Static phases
preflight(PreflightContext)andpreclaim(PreclaimContext); memberdoApply()withApplyContext ctx_ - Members you will use:
accountID_,preFeeBalance_(reserve checks),view() ConsequencesFactoryType { Normal, Blocker, Custom }declares how the tx behaves in the queue- Concrete transactors live in
src/libxrpl/tx/transactors/<family>/ - Adding a type: TxFormats entry, transactor class, registration in applySteps, amendment gate
- The CheckCreate case study (two modules ahead) is the working template
- Watch out: preflight and preclaim are static, so no member state; only
doApplymay write
Next up. You met the family; now watch one member run the gauntlet. Next: the processing pipeline, preflight to doApply, and why each gate exists.
Resources
Assignments
0 of 2 completeUnlocks
Finishing this module opens up: