
RPC authentication & error handling
Role-based access control and the RPC error-code system.
What you'll learn
- Explain the `Role` enum and role checks.
- Use the `ErrorCodeI` error codes and `rpcError`.
- Validate input and map errors to responses.
Securing Your RPC Handlers with Role-Based Access Control
Introduction
≈60 min · Advanced · builds on RPC architecture & request flow
Not every caller should be able to do everything, and every failure needs a clear answer. In this module you'll learn rippled's role-based access control (the Role enum and how roles get assigned), the standardized error-code system, and how handlers charge resources to keep abusive clients in check. Security and good error hygiene, side by side.
The Role Hierarchy
In brief: the Role levels (admin, user, and so on) that gate what a caller may do.
Rippled defines five distinct permission levels:
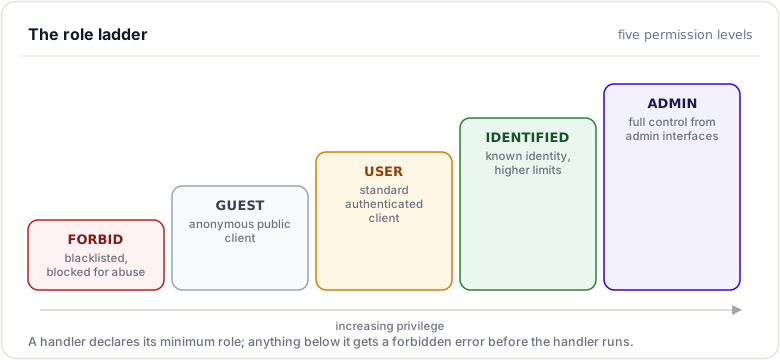
Role Definitions
| Role | Description | Typical Use Case |
|---|---|---|
| FORBID | Blacklisted client | Blocked due to abuse |
| GUEST | Unauthenticated public access | Public API endpoints, read-only queries |
| USER | Authenticated client | Standard API operations, account queries |
| IDENTIFIED | Trusted gateway or service | Transaction submission, privileged reads |
| ADMIN | Full administrative access | Node management, dangerous operations |
Source Location: src/xrpld/core/Config.h
Key idea. RPC security is role-based: the same command can be allowed for an admin and refused for an anonymous caller. The role, not the command, is the gate.
Role Determination
In brief: how a request's role is decided, often from its source IP or the config.
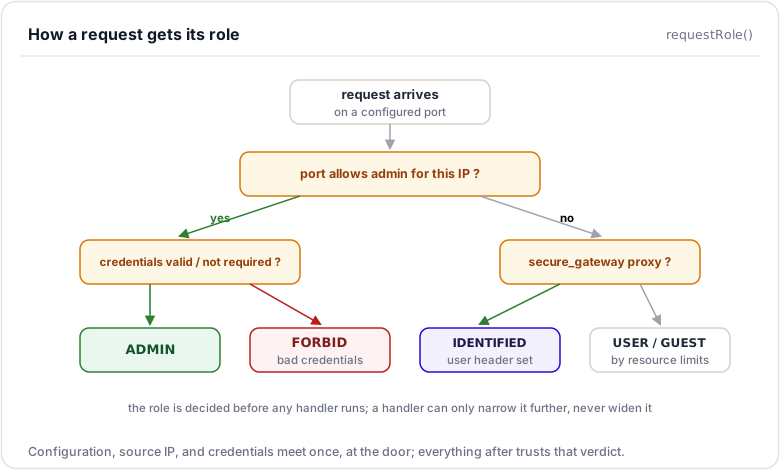
Roles are assigned based on the client's IP address and connection type:
IP-Based Assignment
// src/xrpld/core/detail/Config.cpp
Role getRoleFromConnection(
    boost::asio::ip::address const& remoteIP,
    Port const& port)
{
    // Admin IPs have full access
    if (config_.ADMIN.contains(remoteIP))
        return Role::ADMIN;

    // Secure gateway IPs are identified
    if (config_.SECURE_GATEWAY.contains(remoteIP))
        return Role::IDENTIFIED;

    // Check if port requires admin access
    if (port.admin_nets && port.admin_nets->contains(remoteIP))
        return Role::ADMIN;

    // Default to USER for authenticated connections
    return Role::USER;
}
Configuration
File: xrpld.cfg
# Admin-only access from localhost
[rpc_admin]
admin = 127.0.0.1, ::1

# Trusted gateway access
[secure_gateway]
ip = 192.168.1.100

# Port configuration
[port_rpc_admin_local]
port = 5005
ip = 127.0.0.1
admin = 127.0.0.1
protocol = http

[port_rpc_public]
port = 5006
ip = 0.0.0.0
protocol = http
Assigning Roles to Handlers
In brief: declaring the minimum role in the handler table.
When registering a handler, specify the minimum required role:
Example Registrations
// Public read-only command (available to everyone)
{
    "server_info",
    {
        &doServerInfo,
        Role::GUEST,  // Lowest permission
        RPC::NoCondition
    }
}

// Standard query (requires authentication)
{
    "account_info",
    {
        &doAccountInfo,
        Role::USER,  // Moderate permission
        Condition::NeedsCurrentLedger
    }
}

// Transaction submission (requires trust)
{
    "submit",
    {
        &doSubmit,
        Role::IDENTIFIED,  // Higher permission
        Condition::NeedsNetworkConnection
    }
}

// Administrative command (full access only)
{
    "stop",
    {
        &doStop,
        Role::ADMIN,  // Maximum permission
        RPC::NoCondition
    }
}
Permission Enforcement
In brief: how handlers actually enforce the role a command requires.
The RPC dispatcher automatically enforces role requirements before invoking handlers:
Automatic Check
// src/xrpld/rpc/detail/Handler.cpp
if (context.role < handlerInfo.role) {
    return rpcError(RpcNoPermission,
        "You don't have permission for this command");
}
Manual Check (Inside Handler)
For fine-grained control:
Json::Value doSensitiveOperation(RPC::JsonContext& context)
{
    // Check if caller has admin privileges
    if (context.role < Role::ADMIN) {
        return rpcError(RpcNoPermission,
            "This operation requires admin access");
    }

    // Additional checks
    if (context.role < Role::IDENTIFIED &&
        context.params.isMember("dangerous_option"))
    {
        return rpcError(RpcNoPermission,
            "Only identified users can use this option");
    }

    // Proceed with operation
    // ...
}
Resource Management
In brief: charging resources to throttle abusive clients.
Rippled tracks API usage to prevent denial-of-service attacks:
Resource Charging
// Each request consumes resources
context.consumer.charge(Resource::feeReferenceRPC);

// High-cost operations charge more
if (isExpensiveQuery) {
    context.consumer.charge(Resource::feeHighBurdenRPC);
}
Resource Limits
// Check if client has exceeded limits
if (!context.consumer.isUnlimited() &&
    context.consumer.balance() <= 0)
{
    return rpcError(RpcSlowDown,
        "You are making requests too frequently");
}
Unlimited Resources
Admin connections have unlimited resources:
bool isUnlimited() const
{
    return role_ >= Role::ADMIN;
}
IP Whitelisting and Blacklisting
In brief: who may even knock on the admin door.
Whitelisting Admin IPs
# xrpld.cfg
[rpc_admin]
admin = 127.0.0.1
admin = 192.168.1.50
admin = ::1
Blacklisting Abusive Clients
Rippled uses a "Gossip" mechanism to share blacklisted IPs across the network:
// Mark a client as abusive
context.netOps.reportAbuse(remoteIP);

// Check if IP is blacklisted
if (context.netOps.isBlacklisted(remoteIP)) {
    return rpcError(RpcForbidden, "Access denied");
}
Secure Gateway Mode
In brief: letting a trusted proxy vouch for identified users.
For production deployments, use secure gateway configuration:
Architecture
Client → Reverse Proxy (nginx) → Rippled
         [IP: 192.168.1.100]      [Trusted]
Configuration
[secure_gateway]
ip = 192.168.1.100

[port_rpc]
port = 5005
ip = 127.0.0.1
protocol = http
Benefits:
- Rippled only accepts connections from the proxy
- Proxy handles TLS termination
- Proxy performs initial authentication
- Reduces attack surface
Password Authentication (WebSocket)
In brief: admin credentials on the socket, and their limits.
WebSocket connections support optional password authentication:
Configuration
[rpc_startup]
{ "command": "log_level", "severity": "warning" }

[port_ws_admin_local]
port = 6006
ip = 127.0.0.1
admin = 127.0.0.1
protocol = ws
admin_user = myuser
admin_password = mypassword
Client Authentication
const ws = new WebSocket('ws://localhost:6006');

ws.send(JSON.stringify({
    command: 'login',
    user: 'myuser',
    password: 'mypassword'
}));

// After successful login, role is elevated to ADMIN
Example: Multi-Level Permission Handler
In brief: one handler whose answer grows with the caller's role.
Let's build a handler with different behavior based on role:
Json::Value doAccountStats(RPC::JsonContext& context)
{
    // Basic validation
    if (!context.params.isMember(jss::account)) {
        return rpcError(RpcInvalidParams, "Missing 'account' field");
    }

    auto const account = parseBase58<AccountID>(
        context.params[jss::account].asString()
    );

    if (!account) {
        return rpcError(RpcActMalformed);
    }

    // Get ledger
    std::shared_ptr<ReadView const> ledger;
    auto const result = RPC::lookupLedger(ledger, context);
    if (!ledger) return result;

    // Read account
    auto const sleAccount = ledger->read(keylet::account(*account));
    if (!sleAccount) {
        return rpcError(RpcActNotFound);
    }

    // Build base response (available to all roles)
    Json::Value response;
    response[jss::account] = to_string(*account);
    response["balance"] = to_string(sleAccount->getFieldAmount(sfBalance));

    // Add details for USER and above
    if (context.role >= Role::USER) {
        response["sequence"] = sleAccount->getFieldU32(sfSequence);
        response["owner_count"] = sleAccount->getFieldU32(sfOwnerCount);
    }

    // Add sensitive info for IDENTIFIED and above
    if (context.role >= Role::IDENTIFIED) {
        response["flags"] = sleAccount->getFieldU32(sfFlags);
        response["previous_txn_id"] = to_string(
            sleAccount->getFieldH256(sfPreviousTxnID)
        );
    }

    // Add administrative data for ADMIN only
    if (context.role >= Role::ADMIN) {
        response["ledger_entry_type"] = "AccountRoot";
        response["index"] = to_string(keylet::account(*account).key);
    }

    return response;
}
Registration:
{
    "account_stats",
    {
        &doAccountStats,
        Role::GUEST,  // Base access for everyone
        Condition::NeedsCurrentLedger
    }
}
Behavior:
- GUEST: Gets only account and balance
- USER: Gets sequence and owner count
- IDENTIFIED: Gets flags and previous transaction ID
- ADMIN: Gets full administrative details
Best Practices
DO
- Always validate roles before sensitive operations
- Use the minimum required role for each handler
- Charge resources appropriately for expensive queries
- Log security events for audit trails
- Test with different roles during development
DON'T
- Don't hardcode IP addresses in handler code
- Don't expose admin functions to lower roles
- Don't skip resource charging for expensive operations
- Don't leak sensitive information in error messages
- Don't trust client-provided role information
Security Checklist
Before deploying a custom handler:
[ ] Minimum role correctly assigned in handler table
[ ] Input validation prevents injection attacks
[ ] Resource charging implemented for expensive operations
[ ] Sensitive data not exposed to unauthorized roles
[ ] Error messages don't leak system information
[ ] Tested with GUEST, USER, and ADMIN roles
[ ] Logs security-relevant events
[ ] Follows principle of least privilege
Conclusion
Rippled's authentication and authorization system provides robust protection for the RPC interface through a well-designed role hierarchy. By combining IP-based role assignment, automatic permission enforcement in the dispatcher, resource charging for expensive operations, and fine-grained access control, the system prevents unauthorized access while enabling legitimate use cases. Understanding these security patterns is essential for building handlers that are both functional and secure, and for deploying nodes that safely expose APIs to different client types.
Error Handling and Validation
In brief: the error contract: shape, codes, and honesty.
Building Robust Handlers with Comprehensive Error Management
Introduction
The difference between a fragile handler and a production-ready one lies in proper error handling and input validation. Every RPC handler must anticipate failures, invalid input, missing resources, permission issues, and unexpected edge cases, and respond with clear, actionable error messages.
In this section, you'll learn the complete error handling framework used throughout Rippled, including standard error codes, HTTP status mapping, input validation patterns, and strategies for protecting sensitive data while providing useful debugging information.
RPC Error Codes
In brief: the code families and when each fires.
Rippled defines a comprehensive set of error codes for different failure scenarios:
Standard Error Codes
Source Location: include/xrpl/protocol/ErrorCodes.h
// From include/xrpl/protocol/ErrorCodes.h (rippled 3.2.0)

// Parameter validation errors
RpcInvalidParams          // Invalid or missing parameters
RpcBadSyntax              // Malformed request structure

// Authentication / permission errors
RpcNoPermission           // Insufficient role for operation
RpcForbidden              // Access denied (e.g. blacklisted IP)
RpcBadCredentials         // Authentication failed

// Ledger-related errors
RpcNoCurrent              // No current (open) ledger available
RpcNoClosed               // No closed (validated) ledger available
RpcLgrNotFound            // Specified ledger not found
RpcInvalidLgrRange        // Ledger range out of bounds

// Account-related errors
RpcActNotFound            // Account not found in ledger
RpcActMalformed           // Account address malformed

// Transaction-related errors
RpcTxnNotFound            // Transaction not found
RpcInternal               // Internal error (catch-all; also unexpected validation failures)
RpcMasterDisabled         // Master key disabled on account
RpcInvalidParams      // Insufficient funds for operation

// Network/Server errors
RpcNoNetwork              // Node not connected to network
RpcNotImpl   // Command not implemented
RpcUnknownCommand         // Unknown RPC command
RpcInternal                // Internal server error
RpcSlowDown               // Rate limited - too many requests
Complete Error Code List
For a comprehensive list of all error codes and their meanings:
enum ErrorCodeI {
    RpcUnknown = -1,
    RpcSuccess = 0,
    RpcBadSyntax = 1,
    RpcNoCurrent = 16,
    RpcActNotFound = 19,
    RpcInvalidParams = 31,
    RpcUnknownCommand = 32,
    RpcActMalformed = 35,
    RpcInternal = 73,
    // ... many more defined
};
HTTP Status Code Mapping
RPC errors must map to appropriate HTTP status codes:
Mapping Strategy
int getHTTPStatusCode(ErrorCodeI errorCode)
{
    switch (errorCode) {
        // 400 Bad Request - Client error in request format
        case RpcInvalidParams:
        case RpcBadSyntax:
            return 400;

        // 401 Unauthorized - Authentication required
        case RpcBadCredentials:
            return 401;

        // 403 Forbidden - Client lacks permission
        case RpcNoPermission:
        case RpcForbidden:
            return 403;

        // 404 Not Found - Requested resource doesn't exist
        case RpcActNotFound:
        case RpcTxnNotFound:
        case RpcLgrNotFound:
            return 404;

        // 429 Too Many Requests - Rate limited
        case RpcSlowDown:
            return 429;

        // 503 Service Unavailable - Server temporarily unable
        case RpcNoCurrent:
        case RpcNoNetwork:
            return 503;

        // 500 Internal Server Error - Unexpected error
        default:
            return 500;
    }
}
Example HTTP Response
HTTP/1.1 400 Bad Request
Content-Type: application/json

{
    "result": {
        "status": "error",
        "error": "invalid_params",
        "error_code": -32602,
        "error_message": "Missing required field: 'account'"
    }
}
Error Response Formatting
Standard Error Response Structure
Every error response follows this format:
{
    "result": {
        "status": "error",
        "error": "error_code_name",
        "error_code": -32602,
        "error_message": "Human-readable error description",
        "request": {
            "command": "the_command_that_failed",
            "... ": "request parameters (sanitized)"
        }
    }
}
Building Error Responses in Code
Source Location: src/xrpld/rpc/detail/RPCHelpers.h
// Simple error - just code and name
return rpcError(RpcInvalidParams);

// Error with custom message
return rpcError(RpcInvalidParams, "Missing 'account' field");

// Error with additional details
Json::Value error = rpcError(RpcActNotFound);
error["detail"] = "Account was deleted from ledger";
return error;

// Helper function definition
Json::Value rpcError(ErrorCodeI errorCode,
                     std::string const& message = "")
{
    Json::Value result;
    result[jss::status] = jss::error;
    result[jss::error] = RPC::errorMessage(errorCode);
    result[jss::error_code] = (int)errorCode;
    if (!message.empty())
        result[jss::error_message] = message;
    return result;
}
Input Validation Patterns
In brief: presence, type, bounds: the order that never changes.
Validate Required Fields
Json::Value doMyHandler(RPC::JsonContext& context)
{
    // Check for required field
    if (!context.params.isMember(jss::account)) {
        return rpcError(RpcInvalidParams, "Missing 'account' field");
    }

    // Validate field type
    if (!context.params[jss::account].isString()) {
        return rpcError(RpcInvalidParams,
            "'account' must be a string");
    }

    // Validate field not empty
    std::string accountStr = context.params[jss::account].asString();
    if (accountStr.empty()) {
        return rpcError(RpcInvalidParams,
            "'account' cannot be empty");
    }

    return Json::Value();  // Valid
}
Validate Numeric Ranges
// Validate unsigned integer with bounds
if (context.params.isMember("limit")) {
    if (!context.params["limit"].isUInt()) {
        return rpcError(RpcInvalidParams,
            "'limit' must be a positive integer");
    }

    unsigned int limit = context.params["limit"].asUInt();

    // Check bounds
    if (limit < 1 || limit > 1000) {
        return rpcError(RpcInvalidParams,
            "'limit' must be between 1 and 1000");
    }
}

// Validate floating-point ranges
if (context.params.isMember("fee_multiplier")) {
    if (!context.params["fee_multiplier"].isNumeric()) {
        return rpcError(RpcInvalidParams,
            "'fee_multiplier' must be numeric");
    }

    double multiplier = context.params["fee_multiplier"].asDouble();

    if (multiplier < 0.1 || multiplier > 1000.0) {
        return rpcError(RpcInvalidParams,
            "'fee_multiplier' must be between 0.1 and 1000");
    }
}
Validate Addresses and Identifiers
// Parse and validate account address
std::string accountStr = context.params[jss::account].asString();
auto account = parseBase58<AccountID>(accountStr);

if (!account) {
    return rpcError(RpcActMalformed,
        "Invalid account address format");
}

// Parse and validate transaction hash
std::string txHashStr = context.params["tx_hash"].asString();
auto txHash = from_hex_string<Hash256>(txHashStr);

if (!txHash) {
    return rpcError(RpcInvalidParams,
        "Invalid transaction hash format");
}

// Parse and validate currency code
std::string currencyStr = context.params["currency"].asString();
auto currency = to_currency(currencyStr);

if (!currency) {
    return rpcError(RpcInvalidParams,
        "Invalid currency code");
}
Validate Enum/Choice Parameters
std::string command = context.params[jss::command].asString();

static constexpr std::array<std::string_view, 3> validCommands = {
    "buy", "sell", "cancel"
};

if (std::find(validCommands.begin(), validCommands.end(), command)
    == validCommands.end())
{
    return rpcError(RpcInvalidParams,
        "command must be 'buy', 'sell', or 'cancel'");
}
Validate Optional Fields
// Optional field with default
unsigned int ledgerIndex = 0;
if (context.params.isMember(jss::ledger_index)) {
    if (context.params[jss::ledger_index].isString()) {
        // Special values like "current", "validated"
        std::string indexStr = context.params[jss::ledger_index].asString();
        if (indexStr != "current" && indexStr != "validated") {
            return rpcError(RpcInvalidParams,
                "ledger_index must be numeric or 'current'/'validated'");
        }
    } else if (context.params[jss::ledger_index].isUInt()) {
        ledgerIndex = context.params[jss::ledger_index].asUInt();
    } else {
        return rpcError(RpcInvalidParams,
            "ledger_index must be numeric or string");
    }
}
Sensitive Data Masking
In brief: what must never appear in logs or error messages.
Protect Private Keys and Secrets
// NEVER expose private keys in responses
Json::Value response;

// Bad: Never do this
// response["private_key"] = account.getPrivateKey();

// Good: Omit sensitive data entirely
response[jss::account] = to_string(accountID);
response[jss::public_key] = to_string(publicKey);
Sanitize Error Messages
// Bad: Leaks information about internal structure
if (database.query(accountID) == nullptr) {
    return rpcError(RpcActNotFound,
        "SELECT * FROM accounts WHERE id = " + std::to_string(accountID)
        + " returned no rows");
}

// Good: Hide implementation details
if (database.query(accountID) == nullptr) {
    return rpcError(RpcActNotFound,
        "Account not found");
}
Mask Sensitive Request Data
Json::Value getSanitizedRequest(RPC::JsonContext const& context)
{
    Json::Value sanitized = context.params;

    // Remove sensitive fields from request echo
    if (sanitized.isMember("secret")) {
        sanitized.removeMember("secret");
    }
    if (sanitized.isMember("seed")) {
        sanitized.removeMember("seed");
    }
    if (sanitized.isMember("private_key")) {
        sanitized.removeMember("private_key");
    }

    // Mask sensitive values
    if (sanitized.isMember("password")) {
        sanitized["password"] = "[REDACTED]";
    }

    return sanitized;
}
Exception Handling
In brief: catching everything so the caller sees an error object, not a crash.
Catch Exceptions in Handlers
Json::Value doMyHandler(RPC::JsonContext& context)
{
    try {
        // Handler implementation
        // ...
        return result;
    }
    catch (std::invalid_argument const& ex) {
        return rpcError(RpcInvalidParams,
            "Invalid argument: " + std::string(ex.what()));
    }
    catch (std::runtime_error const& ex) {
        return rpcError(RpcInternal,
            "Operation failed");  // Don't expose internal error
    }
    catch (std::exception const& ex) {
        return rpcError(RpcInternal,
            "Unexpected error occurred");
    }
}
Standard Exception Types
// std::invalid_argument - for validation errors
if (value < 0) {
    throw std::invalid_argument("value must be non-negative");
}

// std::out_of_range - for bounds violations
if (index >= container.size()) {
    throw std::out_of_range("index out of range");
}

// std::logic_error - for logical errors
if (!precondition) {
    throw std::logic_error("precondition not met");
}

// std::runtime_error - for runtime failures
if (!resource.allocate()) {
    throw std::runtime_error("failed to allocate resource");
}
Comprehensive Validation Example
Here's a complete example showing all validation patterns:
Json::Value doTransferFunds(RPC::JsonContext& context)
{
    // 1. Validate required fields
    for (auto const& field : {"source", "destination", "amount"}) {
        if (!context.params.isMember(field)) {
            return rpcError(RpcInvalidParams,
                std::string("Missing required field: '") + field + "'");
        }
    }

    // 2. Validate source account
    auto source = parseBase58<AccountID>(
        context.params["source"].asString()
    );
    if (!source) {
        return rpcError(RpcActMalformed,
            "Invalid source account address");
    }

    // 3. Validate destination account
    auto destination = parseBase58<AccountID>(
        context.params["destination"].asString()
    );
    if (!destination) {
        return rpcError(RpcActMalformed,
            "Invalid destination account address");
    }

    // 4. Validate source != destination
    if (*source == *destination) {
        return rpcError(RpcInvalidParams,
            "Source and destination cannot be the same");
    }

    // 5. Validate amount
    STAmount amount;
    if (!amountFromJsonNoThrow(amount, context.params["amount"])) {
        return rpcError(RpcInvalidParams,
            "Invalid amount format");
    }

    // 6. Validate amount is positive
    if (amount <= 0) {
        return rpcError(RpcInvalidParams,
            "Amount must be positive");
    }

    // 7. Optional: validate amount bounds
    if (context.params.isMember("max_amount")) {
        STAmount maxAmount;
        if (!amountFromJsonNoThrow(maxAmount,
            context.params["max_amount"]))
        {
            return rpcError(RpcInvalidParams,
                "Invalid max_amount format");
        }

        if (amount > maxAmount) {
            return rpcError(RpcInvalidParams,
                "Amount exceeds maximum allowed");
        }
    }

    // 8. Get and validate ledger
    std::shared_ptr<ReadView const> ledger;
    auto const ledgerResult = RPC::lookupLedger(ledger, context);
    if (!ledger) {
        return ledgerResult;
    }

    // 9. Verify source account exists
    auto sleSource = ledger->read(keylet::account(*source));
    if (!sleSource) {
        return rpcError(RpcActNotFound,
            "Source account not found");
    }

    // 10. Check sufficient balance
    STAmount balance = sleSource->getFieldAmount(sfBalance);
    if (balance < amount) {
        return rpcError(RpcInvalidParams,
            "Insufficient funds in source account");
    }

    // All validation passed - proceed with operation
    Json::Value result;
    result[jss::status] = "success";
    result["transaction_id"] = "..."; // Generated transaction ID
    return result;
}
Validation Best Practices
DO
- Validate early and often, Check all inputs before processing
- Use specific error messages, Help clients understand what went wrong
- Validate all numeric bounds, Prevent overflow, underflow, and resource exhaustion
- Check account existence, Before attempting operations
- Log validation failures, For security monitoring and debugging
- Fail fast, Return errors as soon as validation fails
DON'T
- Trust client input, Always validate, even if it looks correct
- Expose internal errors, Sanitize error messages
- Allow injection attacks, Escape or validate all string inputs
- Leak sensitive data, Never include secrets in responses
- Ignore format validation, Invalid formats can cause crashes
- Disable validation for "trusted" clients, All clients need validation
Common Validation Scenarios
Scenario 1: Currency/Amount Handling
// Validate XRP amount (drops)
if (context.params.isMember("drops")) {
    if (!context.params["drops"].isString()) {
        return rpcError(RpcInvalidParams,
            "'drops' must be a string");
    }

    std::string dropsStr = context.params["drops"].asString();
    auto drops = XRPAmount::from_string_throw(dropsStr);

    if (drops < 0) {
        return rpcError(RpcInvalidParams,
            "XRP amount cannot be negative");
    }
}

// Validate IOU amount
if (context.params.isMember("amount")) {
    STAmount amount;
    if (!amountFromJsonNoThrow(amount, context.params["amount"])) {
        return rpcError(RpcInvalidParams,
            "Invalid amount");
    }

    if (!amount.getCurrency().isValid()) {
        return rpcError(RpcInvalidParams,
            "Invalid currency in amount");
    }
}
Scenario 2: Ledger Index Selection
// Validate and get specific ledger
std::shared_ptr<ReadView const> targetLedger;

if (context.params.isMember(jss::ledger_index)) {
    Json::Value const& indexValue = context.params[jss::ledger_index];

    if (indexValue.isString()) {
        std::string index = indexValue.asString();

        if (index == "validated") {
            targetLedger = context.ledgerMaster.getValidatedLedger();
        } else if (index == "current") {
            targetLedger = context.ledgerMaster.getCurrentLedger();
        } else if (index == "closed") {
            targetLedger = context.ledgerMaster.getClosedLedger();
        } else {
            return rpcError(RpcInvalidParams,
                "ledger_index must be 'validated', 'current', or a number");
        }
    } else if (indexValue.isUInt()) {
        targetLedger = context.ledgerMaster.getLedgerBySeq(
            indexValue.asUInt()
        );
    } else {
        return rpcError(RpcInvalidParams,
            "ledger_index must be numeric or string");
    }

    if (!targetLedger) {
        return rpcError(RpcLgrNotFound,
            "Ledger not found");
    }
}
Scenario 3: Pagination Validation
// Validate pagination parameters
unsigned int pageLimit = 20;  // Default
unsigned int pageIndex = 0;   // Default

if (context.params.isMember("limit")) {
    if (!context.params["limit"].isUInt()) {
        return rpcError(RpcInvalidParams,
            "'limit' must be a positive integer");
    }

    pageLimit = context.params["limit"].asUInt();

    // Enforce maximum limit to prevent DoS
    if (pageLimit < 1 || pageLimit > 1000) {
        return rpcError(RpcInvalidParams,
            "'limit' must be between 1 and 1000");
    }
}

if (context.params.isMember("marker")) {
    if (!context.params["marker"].isString()) {
        return rpcError(RpcInvalidParams,
            "'marker' must be a string");
    }

    std::string marker = context.params["marker"].asString();
    // Validate marker format...
}
Conclusion
Comprehensive error handling and input validation separate production-quality handlers from fragile prototypes. Rippled's error framework provides specific codes for every failure scenario, proper HTTP status mapping, and patterns for protecting sensitive information while giving clients actionable feedback. By validating inputs early, handling exceptions gracefully, and following the principle of failing fast, handlers become robust against malformed requests, edge cases, and potential attacks. These practices are fundamental for any handler that will face real-world traffic.
Summary
This module covered access control and errors for the RPC layer. Security is role-based: the Role of a request (often decided from its source IP or config) gates what it may do, so the same command can be allowed for an admin and refused for an anonymous caller. You also worked with the standardized error codes and saw how resource charging throttles abusive clients.
To remember:
- The
Roleis derived from source IP / port config (src/xrpld/rpc/Role.h) - Admin = requests arriving on an admin-configured interface (
admin=IPs on the port stanza) - Handlers declare a minimum role in the table; enforcement happens before invocation
- Errors:
include/xrpl/protocol/ErrorCodes.h+rpcError()for standard shapes - Resource charging (
Resource::Charge) throttles abusive clients secure_gatewaylets a trusted proxy forward caller identity- Admin-only examples:
get_counts,stop,validators,consensus_info - Watch out: binding an admin port to a public interface is the number-one operational hole; keep admin on localhost
Next up. You know the rules of the road. Time to drive: next you build your own RPC command from scratch.
Resources
Assignments
0 of 2 complete