
Build & run your own xrpld node
Turn the open-source rippled code into a running node: set up the C++ toolchain, compile the `xrpld` binary with Conan + CMake, then run it locally in standalone mode.
What you'll learn
- Set up a C++ build environment (compiler, CMake, Conan, Python) on macOS or Ubuntu.
- Fetch dependencies with Conan and configure the build with CMake.
- Compile the `xrpld` binary from source and confirm it runs.
- Run xrpld in standalone mode and drive it over the API.
Introduction
≈120 min (including compile time) · Intermediate · start here, no prerequisites
Welcome, this is where your journey under the hood of the XRP Ledger begins. Before you can read the code, trace a transaction, or change the protocol, you need your own node running. In this module you'll set up the C++ toolchain, compile the xrpld binary from the open-source rippled source with Conan and CMake, and launch it locally in standalone mode so you can drive it over the API. Take your time with the build, everything that follows in the bootcamp runs on the node you create here.
macOS
In brief: set up the build toolchain on macOS: Node, Clang/Xcode, Python, then Conan and CMake.
Install Node.js via nvm for easy version management:
# Install nvm (if not already installed)
curl -o- https://raw.githubusercontent.com/nvm-sh/nvm/v0.39.0/install.sh | bash

# Install and use the latest LTS version of Node.js
nvm install --lts
nvm use --lts
Prerequisites for Compiling Rippled
- macOS with administrator rights
- Apple account (to download certain versions of Xcode)
- Stable internet connection for dependencies
Checking Clang Version
clang --version
Installing Xcode (if needed)
Version check. xrpld 3.2.0 builds with current Xcode: Xcode 26.6 is confirmed to work. The minimum compiler is Apple Clang 16. If your
clang --versionreports anything older, update Xcode before going further, the build will fail late and cryptically otherwise.
- Download Xcode from the Mac App Store or from Apple Developer. Current versions install directly as
/Applications/Xcode.app, there is no.xipto extract anymore. - Select it as the default toolchain:
sudo xcode-select -s /Applications/Xcode.app/Contents/Developer
export DEVELOPER_DIR=/Applications/Xcode.app/Contents/Developer
- Verify the installation:
clang --version
git --version
clang --versionshould report an Apple clang for your Xcode (16.0.0 or newer).
If you need a specific older version: Apple Developer Downloads still ships versioned
.xiparchives (e.g.Xcode_16.2.xip). Extract, rename (e.g.Xcode_16.2.app), move it to/Applications, and pointxcode-select -sandDEVELOPER_DIRat that path instead.
Installing Build Tools
# Homebrew
/bin/bash -c "$(curl -fsSL https://raw.githubusercontent.com/Homebrew/install/HEAD/install.sh)"

# Essential dependencies
brew update
brew install xz pyenv
Python Configuration
# Install Python 3.11 (or higher) via pyenv
pyenv install 3.11.13
pyenv global 3.11.13
eval "$(pyenv init -)"

# Install Conan (2.17+) and CMake (3.22+)
pip install 'conan>=2.17'
pip install 'cmake>=3.22'
Ubuntu
In brief: the same toolchain on Ubuntu, installed through apt and pipx.
Prerequisites
- Ubuntu with administrator rights
- Stable internet connection
Installing Build Tools
apt update
apt install --yes curl git libssl-dev pipx python3.11 python3-pip make g++-12 libprotobuf-dev protobuf-compiler

# Install CMake
curl -LO "https://github.com/Kitware/CMake/releases/download/v3.25.1/cmake-3.25.1.tar.gz"
tar -xzf cmake-3.25.1.tar.gz
cd cmake-3.25.1
./bootstrap --parallel=$(nproc)
make --jobs $(nproc)
make install
cd ..

# Install Conan
pipx install 'conan>=2.17'
pipx ensurepath
Compilation Process & Generating Binary
In brief: clone rippled, configure Conan and CMake, then compile the xrpld binary.
Building Rippled from Source
Key idea. The binary you are building is called
xrpld. "rippled" is the project and the repository;xrpldis the daemon it produces, so that is the name you will run.
Introduction
Once your development environment is properly configured, the next step is to obtain and build the Rippled source code.
Rippled uses a modern C++ toolchain and relies on Conan for dependency management and CMake for project configuration. These tools ensure consistent builds across different systems while maintaining compatibility with the C++20 standard.
This section will guide you through:
- Cloning the official Rippled repository from the XRPL Foundation’s GitHub.
- Setting up Conan profiles for macOS and Ubuntu.
- Configuring the CMake build system.
- Compiling the Rippled executable in Debug mode.
By following these steps, you’ll have a local, fully compiled version of Rippled, ready for testing, development, and contributing to the XRPL Core.
Cloning the Rippled Repository
Grab the source and switch to the development branch:
mkdir -p ~/projects
cd ~/projects
git clone https://github.com/XRPLF/rippled.git
cd rippled
git checkout 3.2.0
Conan Configuration
Importing default Conan profil.
conan config install conan/profiles/ -tf $(conan config home)/profiles/
- You can check your Conan profile by running
conan profile show
If the default profile does not work for you and you do not yet have a Conan profile, you can create one by running:
conan profile detect
The recipes in Conan Center occasionally need to be patched for compatibility with the latest version of rippled.
To ensure our patched recipes are used, you must add our Conan remote at a higher index than the default Conan Center remote, so it is consulted first. You can do this by running:
conan remote add --index 0 xrplf https://conan.ripplex.io
Build Directory Structure
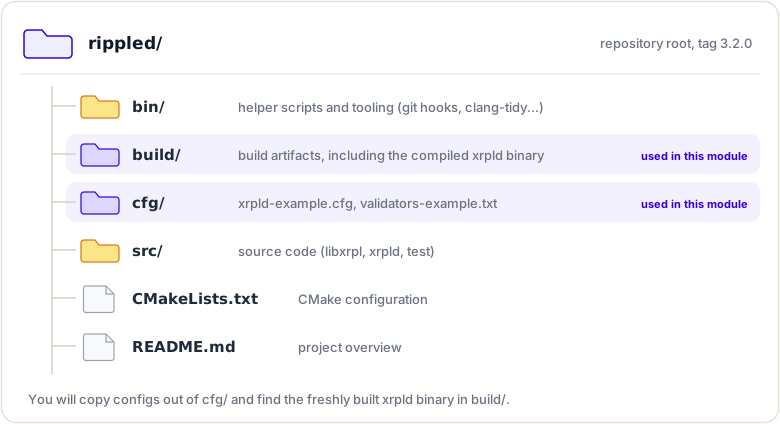
Compiling Rippled
The full build. Expect 30 to 60 minutes the first time:
# Create the build directory
mkdir -p build && cd build

# Install dependencies via Conan
conan install .. --output-folder . --build missing --settings build_type=Debug

# Pass the CMake variable CMAKE_BUILD_TYPE and make sure it matches the one of the build_type settings you chose in the previous step
cmake -DCMAKE_TOOLCHAIN_FILE:FILEPATH=build/generators/conan_toolchain.cmake -DCMAKE_BUILD_TYPE=Debug -Dxrpld=ON -Dtests=ON ..

# Build Rippled
cmake --build . --parallel 10
Compilation may take 30 to 60 minutes depending on your machine.
Verifying the Build
Once compilation completes successfully, confirm that the Rippled binary has been created:
# still inside the build/ directory from the previous step
ls ./xrpld
Depending on your CMake generator, the binary may instead be at
./Debug/xrpld(or./Release/xrpld) for multi-config generators.
Then, check the version to ensure the binary runs correctly:
./xrpld --version
Local Development & Testing
In brief: run your fresh node in standalone mode and drive it with the explorer and playground.
Running Rippled in Standalone Mode
Introduction
Once built, Rippled can run in standalone mode, a fully local setup for testing transactions and ledger behavior without connecting to the XRPL network.
It offers full API access and manual ledger control, perfect for isolated development.
You’ll learn to launch Rippled locally and explore it with XRPL Explorer and Playground to simulate end-to-end XRPL workflows.
In stand-alone mode, the server operates without connecting to the network and participating in the consensus process. Without the consensus process, you have to manually advance the ledger and no distinction is made between "closed" and "validated" ledgers. However, the server still provides API access and processes transactions the same.
Learn more about stand-alone mode.
cd ~/projects/rippled/build
cp ../cfg/xrpld-example.cfg ./xrpld.cfg
Watch out. Launched as-is, the copied config aborts twice. First, it points at system paths (
/var/lib/xrpld/db,/var/log/xrpld/debug.log) that only root can create:Can not create "/var/lib/xrpld/db". Second, its[validators_file]section requires avalidators.txtnext to the config:The file specified in [validators_file] does not exist. And since everyxrpldinvocation parses the config, even a client command likesubmithits the same abort. Fix both before the first launch.
Create a local data directory, rewrite the three paths in xrpld.cfg, and provide the validators file:
mkdir -p db
sed -i.bak \
  -e 's|^path=/var/lib/xrpld/db/nudb|path=./db/nudb|' \
  -e 's|^/var/lib/xrpld/db|./db|' \
  -e 's|^/var/log/xrpld/debug.log|./debug.log|' \
  ./xrpld.cfg

# [validators_file] requires this file to exist, even in standalone.
# The example is entirely commented out = an empty trust list, which is
# exactly right here: standalone runs no consensus, so no validators needed.
cp ../cfg/validators-example.txt ./validators.txt
(Or edit them by hand; the result should read:)
[node_db]
type=NuDB
path=./db/nudb

[database_path]
./db

[debug_logfile]
./debug.log
Then launch:
./xrpld -a --conf ./xrpld.cfg
- Optional variant: starting from a genesis ledger file
A --ledgerfile lets you start from a predefined first ledger instead of the default empty one. The one below contains three state entries: an account holding the full XRP supply, an Amendments entry with 78 amendments pre-enabled (so protocol features work from ledger 1 without any voting), and the fee settings.
Watch out. With
--ledgerfileyou are no longer in the default standalone starting state: your ledger 1 is whatever the file defines. The rest of this module, in particular the "Create and fund test accounts" loop below, assumes the default start without--ledgerfile. If you use a ledger file, skip that loop and define your starting accounts directly in the file instead (add theirAccountRootentries toaccountState).
Save it as genesis.json in your build/ directory, then launch with it:
{
  "ledger": {
    "accepted": true,
    "accountState": [
      {
        "Account": "rHb9CJAWyB4rj91VRWn96DkukG4bwdtyTh",
        "Balance": "100000000000000000",
        "Flags": 0,
        "LedgerEntryType": "AccountRoot",
        "OwnerCount": 0,
        "PreviousTxnID": "",
        "PreviousTxnLgrSeq": 0,
        "Sequence": 1,
        "index": "2B6AC232AA4C4BE41BF49D2459FA4A0347E1B543A4C92FCEE0821C0201E2E9A8"
      },
      {
        "Amendments": [
          "138B968F25822EFBF54C00F97031221C47B1EAB8321D93C7C2AEAF85F04EC5DF",
          "B32752F7DCC41FB86534118FC4EEC8F56E7BD0A7DB60FD73F93F257233C08E3A",
          "7CA70A7674A26FA517412858659EBC7EDEEF7D2D608824464E6FDEFD06854E14",
          "677E401A423E3708363A36BA8B3A7D019D21AC5ABD00387BDBEA6BDE4C91247E",
          "894646DD5284E97DECFE6674A6D6152686791C4A95F8C132CCA9BAF9E5812FB6",
          "AE6AB9028EEB7299EBB03C7CBCC3F2A4F5FBE00EA28B8223AA3118A0B436C1C5",
          "D3456A862DC07E382827981CA02E21946E641877F19B8889031CC57FDCAC83E2",
          "8EC4304A06AF03BE953EA6EDA494864F6F3F30AA002BABA35869FBB8C6AE5D52",
          "83FD6594FF83C1D105BD2B41D7E242D86ECB4A8220BD9AF4DA35CB0F69E39B2A",
          "DAF3A6EB04FA5DC51E8E4F23E9B7022B693EFA636F23F22664746C77B5786B23",
          "A730EB18A9D4BB52502C898589558B4CCEB4BE10044500EE5581137A2E80E849",
          "C1CE18F2A268E6A849C27B3DE485006771B4C01B2FCEC4F18356FE92ECD6BB74",
          "1CB67D082CF7D9102412D34258CEDB400E659352D3B207348889297A6D90F5EF",
          "726F944886BCDF7433203787E93DD9AA87FAB74DFE3AF4785BA03BEFC97ADA1F",
          "1E7ED950F2F13C4F8E2A54103B74D57D5D298FFDBD005936164EE9E6484C438C",
          "950AE2EA4654E47F04AA8739C0B214E242097E802FD372D24047A89AB1F5EC38",
          "C7981B764EC4439123A86CC7CCBA436E9B3FF73B3F10A0AE51882E404522FC41",
          "9196110C23EA879B4229E51C286180C7D02166DA712559F634372F5264D0EC59",
          "763C37B352BE8C7A04E810F8E462644C45AFEAD624BF3894A08E5C917CF9FF39",
          "31E0DA76FB8FB527CADCDF0E61CB9C94120966328EFA9DCA202135BAF319C0BA",
          "EE3CF852F0506782D05E65D49E5DCC3D16D50898CD1B646BAE274863401CC3CE",
          "35291ADD2D79EB6991343BDA0912269C817D0F094B02226C1C14AD2858962ED4",
          "7BB62DC13EC72B775091E9C71BF8CF97E122647693B50C5E87A80DFD6FCFAC50",
          "2BF037D90E1B676B17592A8AF55E88DB465398B4B597AE46EECEE1399AB05699",
          "755C971C29971C9F20C6F080F2ED96F87884E40AD19554A5EBECDCEC8A1F77FE",
          "96FD2F293A519AE1DB6F8BED23E4AD9119342DA7CB6BAFD00953D16C54205D8B",
          "12523DF04B553A0B1AD74F42DDB741DE8DC06A03FC089A0EF197E2A87F1D8107",
          "C393B3AEEBF575E475F0C60D5E4241B2070CC4D0EB6C4846B1A07508FAEFC485",
          "03BDC0099C4E14163ADA272C1B6F6FABB448CC3E51F522F978041E4B57D9158C",
          "3318EA0CF0755AF15DAC19F2B5C5BCBFF4B78BDD57609ACCAABE2C41309B051A",
          "DB432C3A09D9D5DFC7859F39AE5FF767ABC59AED0A9FB441E83B814D8946C109",
          "15D61F0C6DB6A2F86BCF96F1E2444FEC54E705923339EC175BD3E517C8B3FF91",
          "C98D98EE9616ACD36E81FDEB8D41D349BF5F1B41DD64A0ABC1FE9AA5EA267E9C",
          "8CC0774A3BF66D1D22E76BBDA8E8A232E6B6313834301B3B23E8601196AE6455",
          "56B241D7A43D40354D02A9DC4C8DF5C7A1F930D92A9035C4E12291B3CA3E1C2B",
          "27CD95EE8E1E5A537FF2F89B6CEB7C622E78E9374EBD7DCBEDFAE21CD6F16E0A",
          "AE35ABDEFBDE520372B31C957020B34A7A4A9DC3115A69803A44016477C84D6E",
          "73761231F7F3D94EC3D8C63D91BDD0D89045C6F71B917D1925C01253515A6669",
          "2E2FB9CF8A44EB80F4694D38AADAE9B8B7ADAFD2F092E10068E61C98C4F092B0",
          "93E516234E35E08CA689FA33A6D38E103881F8DCB53023F728C307AA89D515A7",
          "47C3002ABA31628447E8E9A8B315FAA935CE30183F9A9B86845E469CA2CDC3DF",
          "75A7E01C505DD5A179DFE3E000A9B6F1EDDEB55A12F95579A23E15B15DC8BE5A",
          "DF8B4536989BDACE3F934F29423848B9F1D76D09BE6A1FCFE7E7F06AA26ABEAD",
          "F1ED6B4A411D8B872E65B9DCB4C8B100375B0DD3D62D07192E011D6D7F339013",
          "32A122F1352A4C7B3A6D790362CC34749C5E57FCE896377BFDC6CCD14F6CD627",
          "B2A4DB846F0891BF2C76AB2F2ACC8F5B4EC64437135C6E56F3F859DE5FFD5856",
          "98DECF327BF79997AEC178323AD51A830E457BFC6D454DAF3E46E5EC42DC619F",
          "B6B3EEDC0267AB50491FDC450A398AF30DBCD977CECED8BEF2499CAB5DAC19E2",
          "452F5906C46D46F407883344BFDD90E672B672C5E9943DB4891E3A34FEEEB9DB",
          "AF8DF7465C338AE64B1E937D6C8DA138C0D63AD5134A68792BBBE1F63356C422",
          "955DF3FA5891195A9DAEFA1DDC6BB244B545DDE1BAA84CBB25D5F12A8DA68A0C",
          "B4E4F5D2D6FB84DF7399960A732309C9FD530EAE5941838160042833625A6076",
          "4F46DF03559967AC60F2EB272FEFE3928A7594A45FF774B87A7E540DB0F8F068",
          "1F4AFA8FA1BC8827AD4C0F682C03A8B671DCDF6B5C4DE36D44243A684103EF88",
          "25BA44241B3BD880770BFA4DA21C7180576831855368CBEC6A3154FDE4A7676E",
          "00C1FC4A53E60AB02C864641002B3172F38677E29C26C5406685179B37E1EDAC",
          "89308AF3B8B10B7192C4E613E1D2E4D9BA64B2EE2D5232402AE82A6A7220D953",
          "30CD365592B8EE40489BA01AE2F7555CAC9C983145871DC82A42A31CF5BAE7D9",
          "621A0B264970359869E3C0363A899909AAB7A887C8B73519E4ECF952D33258A8",
          "8F81B066ED20DAECA20DF57187767685EEF3980B228E0667A650BAF24426D3B4",
          "C4483A1896170C66C098DEA5B0E024309C60DC960DE5F01CD7AF986AA3D9AD37",
          "2CD5286D8D687E98B41102BDD797198E81EA41DF7BD104E6561FEB104EFF2561",
          "586480873651E106F1D6339B0C4A8945BA705A777F3F4524626FF1FC07EFE41D",
          "FBD513F1B893AC765B78F250E6FFA6A11B573209D1842ADC787C850696741288",
          "5D08145F0A4983F23AFFFF514E83FAD355C5ABFBB6CAB76FB5BC8519FF5F33BE",
          "3CBC5C4E630A1B82380295CDA84B32B49DD066602E74E39B85EF64137FA65194",
          "58BE9B5968C4DA7C59BA900961828B113E5490699B21877DEF9A31E9D0FE5D5F",
          "CA7C02118BA27599528543DFE77BA6838D1B0F43B447D4D7F53523CE6A0E9AC2",
          "7117E2EC2DBF119CA55181D69819F1999ECEE1A0225A7FD2B9ED47940968479C",
          "157D2D480E006395B76F948E3E07A45A05FE10230D88A7993C71F97AE4B1F2D1",
          "F64E1EABBE79D55B3BB82020516CEC2C582A98A6BFE20FBE9BB6A0D233418064",
          "67A34F2CF55BFC0F93AACD5B281413176FEE195269FA6D95219A2DF738671172",
          "3012E8230864E95A58C60FD61430D7E1B4D3353195F2981DC12B0C7C0950FFAC",
          "740352F2412A9909880C23A559FCECEDA3BE2126FED62FC7660D628A06927F11",
          "36799EA497B1369B170805C078AEFE6188345F9B3E324C21E9CA3FF574E3C3D6",
          "0285B7E5E08E1A8E4C15636F0591D87F73CB6A7B6452A932AD72BBC8E5D1CBE3",
          "3C43D9A973AA4443EF3FC38E42DD306160FBFFDAB901CD8BAA15D09F2597EB87",
          "86E83A7D2ECE3AD5FA87AB2195AE015C950469ABF0B72EAACED318F74886AE90"
        ],
        "Flags": 0,
        "LedgerEntryType": "Amendments",
        "index": "7DB0788C020F02780A673DC74757F23823FA3014C1866E72CC4CD8B226CD6EF4"
      },
      {
        "BaseFee": "A",
        "Flags": 0,
        "LedgerEntryType": "FeeSettings",
        "ReferenceFeeUnits": 10,
        "ReserveBase": 1000000,
        "ReserveIncrement": 200000,
        "index": "4BC50C9B0D8515D3EAAE1E74B29A95804346C491EE1A95BF25E4AAB854A6A651"
      }
    ],
    "account_hash": "5DF3A98772FB73E782B8740E87885C6BAD9BA486422E3626DEF968AD2CB2C514",
    "close_flags": 0,
    "close_time": 0,
    "close_time_human": "",
    "close_time_resolution": 10,
    "closed": true,
    "hash": "56DA0940767AC2F17F0E384F04816002403D0756432B9D503DDA20128A2AAF11",
    "ledger_hash": "56DA0940767AC2F17F0E384F04816002403D0756432B9D503DDA20128A2AAF11",
    "ledger_index": "1",
    "parent_close_time": 0,
    "parent_hash": "",
    "seqNum": "1",
    "totalCoins": "100000000000000000",
    "total_coins": "100000000000000000",
    "transaction_hash": "9A77D1D1A4B36DA77B9C4DC63FDEB8F821741D157802F9C42A6ED86003D8B4A0",
    "transactions": []
  },
  "ledger_current_index": 1,
  "status": "success",
  "validated": true
}
./xrpld -a --conf ./xrpld.cfg --ledgerfile ./genesis.json
The following options determine which ledger to load first when starting up.
- Check the logs to confirm that the server is running correctly.
Create and fund test accounts (standalone)
Prerequisite: a running node, started the default way. Every command below talks to a live
xrpldinstance started without--ledgerfile: keep./xrpld -a --conf ./xrpld.cfgrunning in its own terminal, open a second terminal in the samebuild/directory, and run the commands there. If the node is not running they all fail with a connection error; if you started from a ledger file, this loop does not apply (your starting accounts come from the file itself).
Standalone mode has no faucet. You fund accounts yourself from the genesis account, which holds the entire XRP supply and whose credentials are public knowledge in standalone: address rHb9CJAWyB4rj91VRWn96DkukG4bwdtyTh, seed snoPBrXtMeMyMHUVTgbuqAfg1SUTb (derived from the passphrase masterpassphrase). Nearly every lab in this bootcamp assumes two funded test accounts, so learn this four-step loop now:
# 1. Generate a key pair (keep account_id and master_seed)
./xrpld --conf ./xrpld.cfg wallet_propose

# 2. Send 1,000 XRP (in drops) from genesis to your new account
./xrpld --conf ./xrpld.cfg submit snoPBrXtMeMyMHUVTgbuqAfg1SUTb '{
  "TransactionType": "Payment",
  "Account": "rHb9CJAWyB4rj91VRWn96DkukG4bwdtyTh",
  "Destination": "<your account_id>",
  "Amount": "1000000000"
}'

# 3. Close the ledger manually (standalone has no consensus to do it for you)
./xrpld --conf ./xrpld.cfg ledger_accept

# 4. Verify the account exists and holds the funds
./xrpld --conf ./xrpld.cfg account_info <your account_id>
Repeat steps 1, 2 and 4 for a second account. Until ledger_accept runs, the payment sits in the open ledger; account_info on a validated ledger only sees it after the close.
Key idea. Standalone funding is always the same loop:
wallet_propose, pay from genesis,ledger_accept, verify. Every "create two funded test accounts" instruction in later modules means exactly this.
Interacting with Rippled via the XRPL Technical Explorer
The XRPL Technical Explorer is XRPLF's technical (JSON-first) explorer for ledgers, transactions, and objects. Pointed at your standalone node, it gives you a click-through view of everything you submit.
- Clone and install it (once), in your home directory:
cd ~
git clone https://github.com/xrplf/xrpl-technical-explorer.git
cd xrpl-technical-explorer
npm install
- Launch it against your local node's WebSocket port (6006 with the example config, while
xrpldruns):
NODE_OPTIONS=--openssl-legacy-provider VUE_APP_WSS_ENDPOINT=ws://localhost:6006 npm run serve
Watch out. Without
NODE_OPTIONS=--openssl-legacy-provider, modern Node (17+) aborts the build withError: error:0308010C:digital envelope routines::unsupported(ERR_OSSL_EVP_UNSUPPORTED): the explorer's older webpack uses a hash algorithm that OpenSSL 3 disabled by default, and this flag re-enables it for the dev server only. Alternative if you prefer:nvm install 16 && nvm use 16, then run without the flag.
- Navigate to http://localhost:8080/ and explore: submit a payment from your second terminal, close the ledger with
ledger_accept, then click through the ledger, the transaction, and its metadata in the explorer.
Watch out. The explorer will sit on "Waiting for the next ledger to close..." forever until you close one. That is standalone working as designed: with no consensus, nothing closes ledgers for you. Use the Close ledger button at the top right of the explorer: connected to your node's admin WebSocket, it triggers a
ledger_accept, which closes the current open ledger and makes your submitted transactions land. Click it after every transaction (or batch) you want to see; running./xrpld --conf ./xrpld.cfg ledger_acceptfrom the second terminal does exactly the same thing.
- Cross-check what the explorer shows with the same data over RPC:
server_info,ledger_current,account_info.
Summary
This module got your development node running. You set up the C++ toolchain (compiler, CMake, Conan, Python) on macOS or Ubuntu, compiled the xrpld binary from the open-source rippled source, and launched it in standalone mode, a fully local setup where you control the ledger and drive the node over the API. That node is the foundation every later module builds on.
To remember:
- Toolchain: Python 3.11+, Conan 2.17+, CMake 3.22+; rippled 3.2.0 is C++20 (GCC 12 / Clang 16 / Apple Clang 16 minimum; Xcode 26.6 confirmed on macOS)
- The repository is
rippled; the binary it builds isxrpld - Check out the stable tag:
git checkout 3.2.0 - Add the patched Conan remote first:
conan remote add --index 0 xrplf https://conan.ripplex.io - Build:
conan install .. --build missing, thencmake -Dxrpld=ON -Dtests=ON .., thencmake --build . --parallel - Standalone mode:
./xrpld -a --conf ./xrpld.cfg; you advance the ledger yourself withledger_accept - Before the first launch: repoint
[node_db] path,[database_path]and[debug_logfile]to local paths, andcp ../cfg/validators-example.txt ./validators.txt(required by[validators_file]even in standalone) - Standalone funding:
wallet_propose, pay from genesis (rHb9...dtyTh, seedsnoPBrXtMeMyMHUVTgbuqAfg1SUTb),ledger_accept,account_info - Config examples live in
cfg/(xrpld-example.cfg,validators-example.txt) - Watch out: the Conan
build_typeand CMakeCMAKE_BUILD_TYPEmust match, and the first build takes 30 to 60 minutes
Next up. Your node runs, but right now it is a black box that happens to answer RPC calls. Time to open it: who wires those seventy subsystems together when the process starts? Meet the Application layer.
Resources
Assignments
0 of 2 complete